We have had small pantries before, but man, this one in Japan takes the cake for BY FAR the smallest. We have tons of drawers that we can pile stuff in, but honestly it’s just so hard to find what we need when things aren’t sorted and organized.
I have found a bit of a love for open shelving, especially when items are displayed in beautiful jars and are so easily accessible. That being said, I also have a deep-seated hate for paying a lot for my home decor. (Hence my DIY hacks that are almost always under $20.)
So of course, I turned to my trusted Japanese Dollar stores for help.
So, I made a trip to both Daiso and Seria (the dollar stores here in Japan) and I got to work. In all reality, most dollar stores will have containers similar to the ones that I bought here. I decided to only stick with glass, simply because I knew it would probably withstand future moves better. (Fingers crossed for smart packers, right?)
I do recommend ONLY buying jars that are airtight for storing food, though. I purchased ones that were airtight, but also totally dishwasher safe.
Daiso flowers displayed in a Daiso feed sackAll jars from Daiso. Top jars were 250 yen each, and the bottom ones were 100 yen each.The hooks installed on my wall are also from Seria, and are the same hooks I used to make my DIY coat rack. I have not yet gone over the screws with my iron paint to make them not a super glaring silver- oops. 😉 The two small grey baskets can be found at Daiso, and come with the lids. They are also stackable! Jars with the white handle lids come from Seria. These are the BEST with our toddler, because he picks up what he wants and carries it to us.
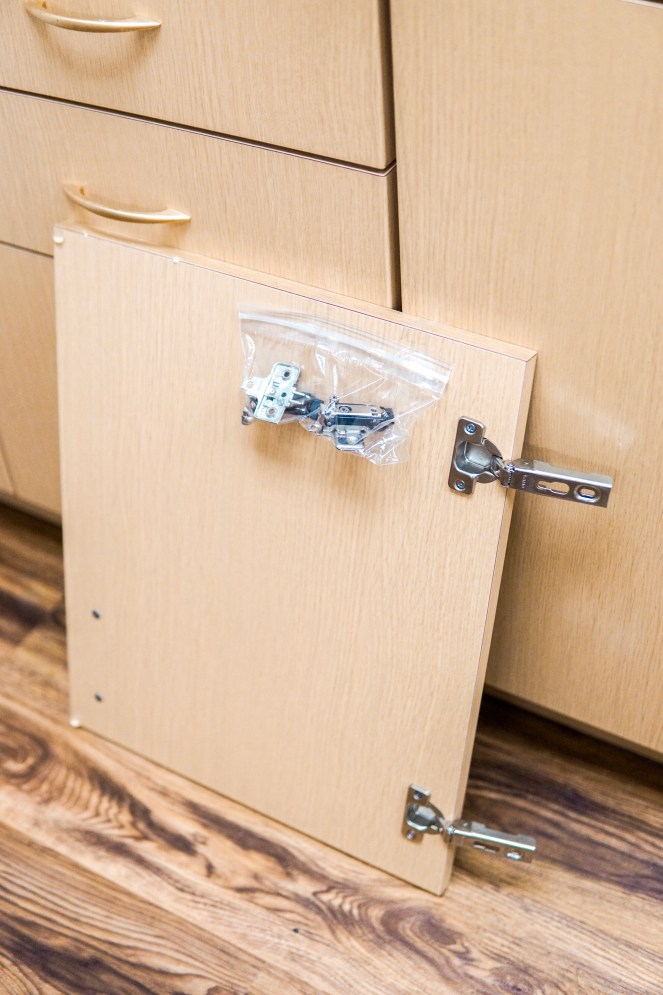
First, I removed the doors and hardware from the main pantry cabinet in our house. Read below for some tips on successfully removing hardware in rentals.
My white bowls are from Target YEARS ago, unfortunately they no longer carry them, but I am waiting to find some similar to link for you. The regular mason sized jars on the bottom come from Daiso.
Next, I removed the hardware and doors from above the sink, just to give an accent cabinet to the room.
300 yen jars from Daiso- these hold our entire supply of rice, pasta, and several boxes of our cereal. Get rid of ugly boxes, and you can see EXACTLY how much you have. Win-win.
Tips:
Take off hardware, and store them in a plastic baggy.
I mentioned this in my past post about how to convert a small closet to a mudroom, but here is the information again!
So, yes. Take off all of the hardware, and store them in a plastic baggy. Or, simply leave it attached to the doors! We take all the screws and pieces that don’t remain attached to the doors, and store them in a plastic baggy, then tape it with painter’s tape to the door. This way the tape doesn’t damage the door, but we are able to know for SURE that the hardware stays put with the door. When moving out, we just place the door with the taped hardware beside the closet for our housing inspection. (Or if you are required to replace the doors where you live, all the hardware is right there, and you don’t have to go searching for it!)
Store your doors under a couch or bed.
This way kids, pets, or adults don’t damage them in any way, and they are totally out of the way! We store ours underneath our king size bed, so they are totally hidden under there. (Thanks to our sweet friend Sierra, for the idea of storing things under couches or beds. This works so well for us.)
The largest 300 yen storage containers.These are 100 yen containers that I believe that have BOTH at Seria and Daiso. If I remember correctly, these came from Daiso. It was just big enough to hold our bag of granola and our bag of quinoa.All of the above are from Daiso. The cross hatch storage baskets are my FAVORITES too. I have these in our closet upstairs, and you can also purchase lids that allow them to be fully stackable.I keep my non-refridgerated pantry items in small crates from Daiso (100 yen) that allow air to flow through them.Very top containers are from Seria, and 100 yen each. I use these for my granola and overnight oats. The beige containers are from Daiso (100¥ each!) Unfortunately my flour and sugar jars (the four across with the pattern) are SUPER old and from Target. I will link some if I find them!
Happy hunting for those dollar store bargains, and be sure to share your pantries on Pinterest with me! (Here is a link to the board this is pinned to.) If you redo yours, I would LOVE to see the results on the “try it” section of my pin!
Living in base housing can be tricky sometimes in regards to decorating, especially if you hate PLAIN. After all, everything has to be basically pristine by the time that you leave, and with usually only 2-4 years at each house, it can be extremely tempting to just live with the plain white walls and ugly fixtures in the house.
But I believe it’s possible to do a few simple things to easily make a rental (or base housing) feel like home, while still being able to restore all the changes to move-in-ready condition easily.
Today I will be showing you how we took our tiny front coat closet and transitioned it into a workable space! On our particular base in Misawa, we actually don’t even have to replace the doors- housing will do that for us as long as we keep all the hardware.
So, here is how I turned our TINY, useless coat closet (that was stuffed to the brim with things we couldn’t even reach) into a brand new, cute little mud room! We actually didn’t even use half of the stuff that was in our closet, so it was becoming a catch-all for stuff that just needed to be put away elsewhere.
Halfway through my mess
If you are reading from Misawa, we live in the 3 bedroom townhome style, so this is the closet immediately upon entering your front entryway. Taking the doors off and creating a small bench opens up the space SO much, and makes your entryway look astronomically bigger- for real. I was blown away the second I took those doors off, and I don’t feel incredibly cramped when walking into the house anymore. You can even store guest shoes in the space in front of the bench, which keeps your walkway more clear!
Here’s a couple tips on how we did it:
Take off all hardware, and store it in a plastic baggy
Or, simply leave it attached to the doors! We take all the screws and pieces that don’t remain attached to the doors, and store them in a plastic baggy, then tape it with painter’s tape to the door. This way the tape doesn’t damage the door, but we are able to know for SURE that the hardware stays put with the door. When moving out, we just place the door with the taped hardware beside the closet for our housing inspection. (Or if you are required to replace the doors where you live, all the hardware is right there, and you don’t have to go searching for it!)
Store the doors under a couch or under the bed
This way kids, pets, or adults don’t damage them in any way, and they are totally out of the way! We store ours underneath our king size bed, so they are totally hidden under there. (Thanks to our sweet friend Sierra, for the idea of storing things under couches or beds. This works so well for us.)
And that’s really it! Super, super easy project, and if you search Pinterest (here is the link to my profile– I have some inspiration under my entryway board) , there are a million ways to build a small bench for whatever size your closet space is. I have absolutely NO power tools, other than a super cheap drill and drill bits, and built this last night in around 2 hours.
And because I’m always asked in my Insta/Facebook DMs where I get my products, here are all the links for the shop-able products shown in these photos!
Mason jar – you can get a mason jar just about anywhere! I pick them up all the time from thrift stores, but I linked one here from Amazon! Almost any thrift store will have jars in their glass section, usually from anywhere from 25 cents to $1.
Peonies – these originally came from EBay, but I linked similar ones from Amazon!
Books- we the bottom book at a 25 cent book sale/ the top one belongs to a set that was passed down from family! I love to find old books that have pretty colored covers both for reading, and for decor.
Linen basket -the reviews state that this never regains its shape- which I believe is TOTALLY inaccurate. If you fill it with items, it immediately resumes the shape it should be. We use ours to hold Henry’s winter gear!
Wire baskets -these are the small size, and they often go on sale for $11.99-$12.99! Wait for the sale, and wait for a coupon code. I believe I got mine for around $5 each when I had a 40% off coupon.)
Twinkle lights – I had a coupon for these, making them around $5 for each strand. We have these EVERYWHERE in our house, because I adore twinkle lights. If I get another code, I will update it on my deal page, found HERE. (I run an Amazon discount page on Facebook!)
Hunter boots – the boots shown are my navy blue pair in glossy! I’ve had them for 2 years and they still look basically new. (Isn’t it funny how these have become a decor piece?)
Wreath -this is my DIY wreath for under $10 from Daiso! You can find the tutorial on my blog by clicking the link.
The white planks and bench are actually all made out of wood that I found on the side of the road. (My friends refer to me as the curb queen occasionally.) So many things that are thrown out on a weekly basis are super super useable, even if it isn’t for their original purpose. My favorite thing to do is to take your trash, refinish it, and post it in my own home. Ha.
I believe the white planks originally came from a small crib, the boards for the bench were from a handmade toy box that was falling apart, and the structure from the bench actually comes from two dresser drawers that were being given away for free. Even the screws came from the destructed toy box, so I have absolutely zero dollars invested in the bench that I crafted, minus an 80 cent bottle of stain from Daiso.
Hope you find some inspiration for your own closets! I am so much happier as I enter my home now, and I love the space that my entryway is after taking off those dang doors!
My sweet friend Shannon told me about Daiso the first week we were in Japan, and my entire house is basically filled with treasures from this golden Japanese dollar store. But it wasn’t until recently that it hit me just HOW MANY things you can make from the treasures at Daiso & Seria.
Between lots of doctor appointments and craziness this week, I have started several styles of wreaths to share with you. Make sure you follow my Instagram, Facebook, or Pinterest pages to not miss any of the wreath tutorials I will be posting, because I am making several! (Social buttons are on the side toolbar.) I am also considering doing a Daiso DIY series on the blog with hundreds more projects- mostly farmhouse, rustic, and chic styles. If you’re following along, you won’t miss anything!
Up for today: lamb’s ear farmhouse style wreath. (The stems are labeled as sage at Daiso, though I think they much more resemble lamb’s ear.)
These wreaths sell for anywhere for $30-$70 on Etsy!
You will need:
(1) wreath ring, they have these at Daiso in various sizes. I chose the 30cm size, making this approximately a 12″ wreath (around 15″ wide once you add leaves.)
(5-10) stems of lamb’s ear. Amount is dependent on what size/how full you would like the wreath. I believe I used 8 stems of greenery, plus the floral.
(1-4) stems of floral (totally optional, I chose to buy 3 stems of white flowers to add, two of them were individual “roses,” and one was a multi-flower stem.
(1) hot glue gun & glue sticks
If you choose absolutely everything that I did, the total cost comes out to around $11 total when you factor in the conversion rate. Take off the floral and just make a plain lamb’s ear wreath, and you’re looking at a cost of about $8 or $9!
The greenery on the far right is for another wreath as are the smaller white flowers (stay tuned for that post.) I used the big, fluffy white roses shown in the top.
These lamb’s ear stems are 100yen each, equating to about 88 cents each. I bought eight to cover the wreath ring that I bought- you can feel out how many you personally need dependent on what size of wreath you’d like to make. I think it is easiest to just lay them out on top of the wreath in the store to give you a good visual. I bought the 30cm willow wreath ring for 200 yen, and laid out all my stems on it to decide how many I would need.
Start off by cutting all the tags off your stems. I began by weaving the stems into the willow ring, adding all my stems all the way around the wreath. You will hot glue parts of the stems down, but the more you can weave them in, the better it will obviously stay. Most of the stems from Daiso have wire within them, allowing you to bend them the way you would like.
As you weave them in, they will look similar to this. Very spread out with lots of leaves upside down, but fairly even coverage across the wreath.
Next, begin to hot glue some of the leaves down, and begin to turn all the leaves face up. I like to take photos throughout the process, because this helps me to see where the empty, uneven spaces are. These particular leaves don’t always love to stick well to the hot glue, so sometimes you have to use a little more than you usually would.
You can see the idea above. The part I am pointing to has the leaves adjusted and glued down, while the rest does not. You won’t need to glue every leaf, just feel out which ones seem like they are too wild to leave freely. These particular stems also allow you to adjust each individual leaf, as mentioned above. If some are facing backwards, you can spin them around to face forward.
Don’t be afraid to take the stems completely apart and glue them to new sections, too. I often destruct at least one or two stems in order to add individual leaves in where I feel it is more bare.
Lastly, lay your flowers out and decide how you like them. Once you find a design you like, hot glue them in as well. They usually stick best if you glue them directly to the willow leaf, not to the stems.
When you’re done, your leaves should be evenly spaced. Glue down any loose pieces that seem like they may fall off, and move various leaves to cover any glue spots seen.
And voila! You have created a $10 wreath that can be utilized in so many ways!
We have been in major cleaning and renovating mode around our house this winter, or at least as much as you can be while living in a rental. I picked up a couple boards just to play around with about a week ago, and then the next day stumbled upon these gorgeous little rustic-farmhouse style hooks at the dollar store here in Japan. Everything in the store is 100¥, equating to around 88-90 cents in USD, depending on the exchange rate. Honestly, this rack only really cost me a total of about $8-$9, but I rounded up because I already had the screws and stain that I needed.
Here’s how I made a super easy 30 minute coat rack with a $3 board, $1 hooks, $1 stain, and a couple screws I already had at home!
Materials
The Shelf
(1) board
Homac has this 1×4 board for around 390¥ if I remember correctly. I chose pine because I’m cheap, and basically every type of wood will warp in the humidity. I also just really like the way pine looks when stained. If you invest in a little thicker or heavier wood, it will probably be less likely to warp.
(1) jar of wood stain
Daiso has the stain that I used for 100¥ (around 90 cents). I chose walnut because I like a more rich brown color vs warm stains. One board won’t even put a dent in the jar, so you’ll have it for future projects. You could probably do 5-6 racks with one jar.
(7) hooks
Seria has these hooks for 100¥ each (just a little over $6 for all 7 that I bought.) You can space them out more and use less hooks, or put them closer together and use more.
(14) small screws
Just make sure the screws are shorter than the thickness of the board. I used 3/4″ screws. If you want to keep things uniform, I would recommend using an iron-colored screw. I chose to use regular silver screws, because I already had some iron paint. (Bought that at Homac for a separate project- but it is a little more pricey- somewhere near $10 for a jar.)
Mounting
There are a number of ways you can mount a coat rack safely on the wall. Because our particular home in Japan has studs that cannot be drilled into, I consistently hang heavy things with drywall anchors and screws. Pay attention to the type of anchors you use- each anchor is rated for a certain weight bearing load.
(2) large & long screws
(2) washers
(2) drywall anchors
Step-by-step
1. Stain your board
This is with one layer of stain vs the unstained wood. I added one more for a slightly darker look. It’s definitely personal preference for me, but I like to stain using paper towels. I feel that paint brushes or sponges leave uneven coverage with stain, and I hate ruining rags with stain.
2. Line up your hooks
I chose to space my hooks around 3.5″ apart, with a little over a couple inches left on each end of the board. Line up your hooks in a manner that looks good to you, then measure to make sure everything is lined up evenly.Each hook is about 3/4″ above the bottom of the board.
3.Drill pilot holes
If you need a small drill bit, I bought this one at Daiso for 100¥. I use it for any project that I need a super small pilot hole for.This will keep your wood from splitting and make sure your screws are going in the right direction. The pilot holes do not need to be deep at all- just enough to guide a screw to where it needs to go.
4. Screw your hooks on
Shown are my silver screws here. I then just took a small piece of paper towel, dipped it in my iron paint, and brushed over the top of them.
Voila! You have created a $10 coat rack that will seriously clean up your entryway. Check out my before and after below, too!
Soooo much better, right?!
For mounting, I chose to drill two pilot holes- one at each end of the board, and fasten the rack to the wall with a washer, screw, and drywall anchor in the wall on each side. After hanging it, I could probably use one more solid mounting point in the middle of the board too- but I’ll save that for another day, and will keep the load on it light until then.
I love finding ways to make something for a fraction of the cost that you could purchase it new for. Plus, you can say that you created it all by yourself.
Happy creating!
I’ve got a couple messages about products shown in the photos, so here are the links if you are interested!
Thin Throw Blanket Duck Boots
My boots originally came from Kohl’s, but they are sold out. I linked some that look almost identical from Amazon with good reviews, and they’re like $40 cheaper than I paid! Hunter Boots Galvanized Bucket
This is an example of a sitewide notice - you can change or remove this text in the Customizer under "Store Notice" Dismiss