Japan Life · Misawa Guides

Japan Post Domestic Shipping for Home Based Businesses

Recently I released my blog post on International Shipping Through Japan Post in hopes of making it easier for home based businesses to know how to ship back to the states without using our APO system, which is not allowed. Today I want to help explain the process of shipping anywhere IN Japan, in hopes that military home based businesses throughout Japan will be able to start shipping to the various bases and areas in the country.

Side note, if you are a military member, dependent, or contractor stationed in Japan currently, please join our business network on Facebook here!

____

There are several awesome and affordable options for shipping your goods anywhere within the county (Mainland and Okinawa.) And the best part? With Japan being such a small country geographically speaking, the shipping is usually FAST, FAST, FAST.

Some options will allow you to do all of the shipping 100% from your home until the moment you drop it into a collection box, and others will still require a trip to the Japan Post office.

Before I dive into the different methods, I should also mention that while our base offers Japan Post shipping directly to your door, some bases will still take the Japan Post mail to your BASE post office. If you have tracking on your package, you should be able to see which place it is delivered to. At Misawa, Japan Post delivers direct to your HOME.

Again, thank you SO much to my sweet friend Saaya for helping me understand all of this!

____
First, here is a list of things you will need for shipping domestic within Japan, especially if you want to do your label printing or even just price estimating at home.

  1. A postage scale that weighs in GRAMS/KG.
    This is the one that I have been using since 2017 for any sort of package mailing even in the states, and it has always been accurate for me. I will be purchasing this slightly bigger option (for wider packages) this week though.
  2. Regular packaging/mailing supplies for securely sending your products. (Some shipping methods require using Japan Post materials, others will require you to use your own.)
  3. A printer or access to somewhere that you are able to print your customs forms or labels.
  4. Click Post will require an Amazon Japan or Yahoo Japan account that can link to your account as a payment method if you choose to send items this way.
  5. Measuring tool from Daiso or Seria for measuring package thickness (Japan Post is EXTREMELY strict on package sizes, so I highly recommend buying one of these.)

And that’s basically it! Now let’s dive into the ways you can send mail domestically.

Lastly before I go into shipping methods, I want to send a quick reminder to make sure you are charging sales tax/VAT taxes as they are required.

I personally am using the ETSY platform for my selling and shipping online. Etsy collects the correct necessary taxes based on the buyer’s location (including overseas VAT taxes) and remits them to the correct jurisdictions on your behalf. I visited the legal office at Misawa to ensure that my using of the off base post office would be legal if I were to open an Etsy shop for my hair bows and other creations, and that SOFA would not be violated somehow. I was given the go-ahead by legal. I believe that Shopify functions similarly, and other platforms may as well. Be aware that when selling to an international address, often VAT taxes need to be charged and sent to the correct jurisdictions. Because of this, I would recommend against selling independently, and would lean towards using a platform like Etsy.

If you’d like to open an Etsy for the first time, clicking on my referral link here will give you your first 40 listings for free!

ALL OF THIS TO SAY, I CANNOT GIVE YOU LEGAL OR TAX ADVICE AND THIS BLOG POST IS NOT MEANT TO BE SUCH. If you are concerned about your own business and the legalities behind it, PLEASE visit your legal office or consult a tax professional.

____

Click Post:
Includes tracking | One Flat Rate | Inexpensive

Click Post is arguably the best option for domestic shipping, especially for smaller and lighter items. At the very least, it is the most convenient. Click Post will allow you to ship anywhere within Japan for 198 yen, and will include tracking for your package at the same rate! Even better yet, Click Post allows you to pack your own items, print your own label, and drop your package off at any collection box. (If you are located in Misawa, there is a collection box outside of our own APO post office, which is collected from daily.) I.e. if you don’t want to visit a post office, you don’t have to!

For this shipping type, your packages will fall under these restrictions:

Length should be no less than 14cm, and no more than 34cm.
Width should be no less than 9cm, and no more than 25cm.
The thickness of your package cannot surpass 3cm.
The weight should be under 1kg.

If you send a package bigger than any of these measurements, it will be returned to the sender, so be sure to use your measuring tool from Daiso, as mentioned earlier.

Much like ClickNShip in the states, you will create an account here in order to begin making labels on your online account for printing out at home.
When signing up for a new account, the personal information entry page will ask for your name (frigana), meaning your Japanese pronunciation of your name. You can use this link to enter your name and get the Japanese kanji for that box. The rest of the boxes are fairly self explanatory, just enter your Japanese address vs your American address. Your on-base Japanese address (for Misawa Air Base residents) will read as follows:

Name
House #, Street name
Misawa Air Base
Misawa-Shi Aomori-Ken
033-0012

Of course other bases will have similar addresses, just swap out your zip code, prefecture, city, chome (base), and actual house # and street name. Sometimes it takes a small amount of trial and error to make sure you get every part of your address in the form.

Everything on the ClickPost site will be in Japanese-even Chrome does not translate all of it. Unfortunately there is no way to turn this part into English without completely leaving the ClickPost part of the site. Do all of your registration on Chrome, and choose to automatically translate, and most will translate for you. For those parts that don’t, I used my Google translating app on my phone and simply pointed it at the screen, and it is fairly easily navigated that way.

After entering your own shipping address, you will hook up your Amazon account or Yahoo account to your Click Post account in order for Amazon/Yahoo Pay to function as your payment method! I feel that Amazon Japan is the easiest option to hook up. If you need an Amazon Japan account, it is super easy to make one. Click this link here to begin the process- you should also get a free trial of Amazon Japan Prime if you would like it. (Prime is an awesome way to order your HBB supplies within Japan and have them delivered straight to your door.) Once you link your account, you will begin signing in via either your Amazon or Yahoo account.

Create your account, confirm your email address, and then you may begin creating your labels for shipping!

When printing labels, if your printer messes up and does not print correctly, you will have only 30 minutes to print the label correctly. After this amount of time, the reprint option will no longer be available, and you will have to cancel the label and start over. Labels can be printed in either black and white or color. Also good news-if your label messes up, no worries, Japan Post does not charge your account until the package is actually scanned in at the Post Office!

Once you have printed your label and stuck it to your package, you may drop your package off at any collection box!

The website states that most packages will arrive the next day, sometimes the day after that. The only time it should take longer than 2 days would be if you are shipping to the islands instead of mainland. In which case it will add only a day or two more to the delivery time.

While there aren’t many downsides to ClickPost, unfortunately you are not able to add any “extras” to this shipping method, including express shipping or insurance. If you absolutely need insurance, I would recommend shipping your item via Yu Pack/Yu Mail.

Letter Pack:
Includes tracking | Two Flat Rates | Relatively Inexpensive

Letter packs are decent sized envelopes that are postage prepaid upon purchase, and ready to ship the moment you purchase them and fill them out. Letter packs may be purchased directly at the post office, or at some convenience stores. They come in two types: letter pack plus, and letter pack light. Letter packs unfortunately do not include insurance.

You will be allowed to fill the pack with as much as you would like, as long as you are able to seal the envelope, the thickness is under 3cm without needing to be squished, and the weight is under 4kg. Tracking is included with the letter pack- before you send the package, you will simply have to peel off your part of the tracking number. Letter packs can also be totally packed and shipped without stepping foot in a Post Office. Just seal it, and drop it in a collection box. The same price applies to these envelopes, no matter where you are shipping from or to. Essentially, it functions like a flat rate envelope does in the states- but instead of paying when you send the package, you are paying for your postage when you purchase the envelope itself.

The difference between a letter pack light and a letter pack plus is only a few key points. 370 yen is the price for letter pack lights, which are delivered to mailboxes and may be left. 520yen is the price for the letter pack plus, which will be delivered in-person to the recipient. If the recipient misses attempted delivery, they will have to pick up the item from their local post office. Letter pack plus will also allow you to go over the 3cm limit, as long as the envelope is able to be sealed.

You can buy these envelopes at the post office and most convenience stores. Letter packs are also available at the “stamp shop” which is JP’s online site for purchasing different shipping materials. if purchasing online, you must purchase the packs in sets of 20 though, so unless you are doing some serious shipping, purchasing in person is likely your best bet.

(If you are located in Misawa and have had a newborn on base, the “letter pack” is the way you send all of your documents to the Embassy, and it is the way they send your passport back to you! This is why they have you purchase two envelopes- you are sending them a prepaid letter pack inside of the letter pack you send them in order for them to be able to ship your documents back to you.)

Yu Pack Parcel:
Includes Tracking | Insured

Yu Pack is another great option for domestic shipping, though it is somewhat trickier to do than Click Post. While a little pricier, the dimensions of acceptable packages are also larger than the Click Post option, it will allow for heavier packages, and will also include insurance. Expect to spend at bare minimum around 800 yen within your own prefecture, usually around 1200-1500 yen for shipping to other prefectures. Prices will vary based on shipping destination and package size.
There are 7 sizes for Yu Pack, all determined by the total added cm of the package. See the diagram below for how the package size is added in order to decide which category your package falls into. If a package is heavier than 25kg, you may choose to send it via “weighted Yu Pack.”

Yu Pack parcels must be sent from a certified Yu Pack counter, which can be found at the post office, or at some convenience stores. Your first few times sending this way, I would HIGHLY recommend using the Post Office vs the scanning system at the convenience store.

Yu Pack also does has its own app that you may download for shipping discounts. Unlike the ClickPost process though, you will ONLY be printing a label, not paying for postage. This means that your package still must be taken to a certified Yu Pack location after printing your label. It cannot be dropped into a collection receptacle.

(Also, the app is fully in Japanese, so you will have to have a way to translate it the whole time you are using it. Once you accept the terms and click “new registration” there is a button at the top to switch to English, though not everything in the app will translate. It’s probably a personal preference on whether or not the hassle is worth it for the discounts.)
Once you have registered and entered all of your information including your Japanese address, you will have to confirm your account via your email for your registration to be final.
Several discounts are available for the Yu Pack service. A few include: using the app to register your packages (-180yen) or taking the package directly to the post office instead of another counter (-100 yen.) If shipping multiple items, thresholds also exist for discounts on multiple packages sent at once.

Yu Pack parcel offers a long list of specialized shipping services, including services for airport luggage, golf equipment, snowboarding/skiing, and baggage delivery. (We also commonly use Black Cat for larger packages or luggage like these, but that’s another story for another post.)

Refrigerated Yu Packs are also available for a very small added fee on top of the regular shipping fee.

You may visit this page to get a charge estimate on the type and size of Yu Pack you are looking into sending.

Yu Mail:
Inexpensive | Add-ons Available

While this method is the one that I probably understand the least, to my understanding, Yu Mail is the basic (very small package) shipping option you will get if you simply bring your package into the post office to hand write your label. Using this method you will be allowed to ship items up to 1kg.

Sizing for packages will be as follows: A = 34 cm, within B = 3 cm, within C = 25 cm

Fares will be the same nationwide, just based on weight. Remember to always weigh your packages once fully packed. Leave your package unsealed upon bringing it to the post office, or bring in a sample of what you are sending with you.

Basic Yu Mail will also allow for express sending, registered mail, and proof of delivery. For these added services, you can calculate your cost here.

____

And that is pretty much it! Personally, I will likely never use a method other than ClickPost, because it is just SO dang easy, but Japan Post really does offer a long list of affordable options for their domestic shipping.

Please of course feel free to message me if you ever have any questions- and if I don’t know the answer, I will try to find you somebody who does!

Happy shipping!

Japan Life · Misawa Guides

Japan Post International Shipping for Home Based Businesses

Holy moly, it took me a while to figure all of this out, but I am so excited to share and hopefully help other makers who are serving tours in Japan help their businesses thrive.

Below I will share the shipping process for the off base Japanese Post Office, because it is really the only way we as business owners stationed in Japan, are able to ship things back to the states or internationally. The use of the APO system for business purposes is not allowed, but thankfully there is another option!

I will preface all of this by saying that I am using the ETSY platform for my selling and shipping online. Etsy collects the correct necessary taxes based on the buyer’s location (including overseas VAT taxes) and remits them to the correct jurisdictions on your behalf. I visited the legal office at Misawa to ensure that my using of the off base post office would be legal if I were to open an Etsy shop for my hair bows and other creations, and that SOFA would not be violated somehow. I was given the go-ahead by legal. I believe that Shopify functions similarly, and other platforms may as well. Be aware that when selling to an international address, often VAT taxes need to be charged and sent to the correct jurisdictions. Because of this, I would recommend against selling independently, and would lean towards using a platform like Etsy.

If you’d like to open an Etsy for the first time, clicking on my referral link here will give you your first 40 listings for free!

ALL OF THIS TO SAY, I CANNOT GIVE YOU LEGAL OR TAX ADVICE AND THIS BLOG POST IS NOT MEANT TO BE SUCH. If you are concerned about your own business and the legalities behind it, PLEASE visit your legal office or consult a tax professional.

**Do be aware that the options as of writing this in February 2021 are limited due to Covid-19. When options change again, I will update this post.**

***Prices are due to change April 1, 2021 for most packages sent to the USA through this system***

___

The cheapest and easiest route I have found so far, at least for smaller and easily packed items?
International Mail My Page Service.

Basically, Japan Post has several options for sending smaller, lighter packages internationally for a discounted rate, and they have an online system in place for printing out your customs labels. I was actually fairly surprised at how big of packages they allowed to be shipped this way, and the speeds at which they can reach the US if you are willing to pay a little more.

In order to use their online shipping options, you will need a few basic things:

  1. A postage scale that weighs in GRAMS/KG.
    This is the one that I have been using since 2017 for any sort of package mailing even in the states, and it has always been accurate for me. I will be purchasing this slightly bigger option (for wider packages) this week though.
  2. Regular packaging/mailing supplies for securely sending your products.
  3. A printer or access to somewhere that you are able to print your customs forms.
  4. The “pouches” that Japan Post requires that you use for this kind of shipment.
  5. Yen for the post office for when you send your item. (Still unsure if Japan Post in Misawa takes card, every time I have sent a package it has been a small enough fee for me to just use yen. Next time when I have a bigger group of packages to be sent all at once, I will confirm if they will accept American credit cards or not.)

Here is the process for the Japan Post online shipping account, in a nutshell.

You will create an online profile on the JP website that will be your “shipping profile.” You can save addresses here and enter recipients’ addresses. For your own address, you will use your “Japanese” address instead of your APO box. Thus, anything you have sent to this address will come straight to your door, NOT the base post office.
Your online account simply serves as a way to pre-estimate your shipping costs and create the customs forms for your package.
Once you create your account, you will order the “pouches” that Japan Post requires for this type of shipping. These are free, and are delivered right to your door as well. The pouches simply serve as a waterproof barrier on the outside of your package in which you will place your customs forms.
Once you have created your account and have ordered and received these adhesive pouches, you are ready to begin shipping!

____

Now I will go into the super duper detailed version of the process, along with the tips I have found useful in the few times I have shipped. My apologies for the length of this post, there’s just SO much information in regards to how this process works if you have never dealt with any of it before!

____

First, you will need to create an account through Japan Post online.
Japan Post has an option for translating everything into English. Find that, and select it.

(Scroll to the bottom of the home page. Click “About using this site.”

Then, click the far right option on the top of the next page that says “English.”)


There you go, everything is now in English.

The page you will land on after clicking the English option is the main index page for sending domestic (in Japan) as well as international options.
I’ll link it here in case it doesn’t automatically pull up for you.
This page will give you links to ALL of the available services (and most of the pricing) through Japan Post.

To create an online account, next click on Express Mail Service under the “Sending Overseas” column.


Here you will find the main page for EMS shipping. The main page looks like this, you will see in the upper right hand corner an option to “log in here.” Click this, you will come to a page where you can create your own account.

The next page will give you the option to create an account as an individual or a corporation. I chose to create a corporate customer account. (The difference between individual accounts and corporate accounts is simply how many addresses you can store! I chose the corporate account, because I have repeat customers I ship to, and it is nice to not have to re-enter their addresses every time.)

Next, you will fill out the form that appears.
To help,
Misawa Air Base has a Japanese postal code of 033-0012
Your prefecture is Aomori, which is the SECOND option on the drop-down list (match the kanji to the image below to be sure.)
Your city/town/village will be Misawa-Shi
Your street number is the actual street on base that you live on (i.e. Yellowstone, Thunderjet, etc.) AND Misawa Air Base
(Sometimes on the website there is an “address line 2” available, if so, place Misawa Air Base in this line. You MUST include Misawa Air Base in your address somewhere, as this part of your address somewhat functions as your “chome” or the district of the city in which you live.)
The floor of condo/etc. is your building number and house letter (i.e. tower 117, 9B or 321A)
If you ever need to know Aomori in kanji, it looks like this:

I entered our old address on base to show you the tricky parts of the address entry:

On the lines below these, I only entered my email address. (I did not fill out the “email address of a cellular phone” lines.)
Next, it will ask you to create a password and fill in your secret questions.

Then, you will fill out a brief survey regarding what you intend to use Japan Post for. Do your best to answer the questions to the best of your knowledge. These are my answers, which may or may not be different from yours.

When you have finished, click “accept.” You will then be emailed a “pre-registration link.” You will not be able to use your account until you confirm your account through email. Go to your email, click the link.
Bam, you are now the proud owner of a Japan Post shipping account.

Your home page will look like this once you have logged in.
Your next step will be to click “order pouch.”
These are the little customs document holders that are adhesive and have to be stuck to the outside of your packages.

The next page that comes up will be your request for pouches. To start off with, I requested 20. Use your “Japanese address” as listed in your account from what we entered above.

Press confirm, then confirm one more time, and your pouches will be shipped directly to your door on base. It took around two business days for mine to arrive each time. I happened to be home both times that mine were delivered, but I am assuming they will leave them in a bag on your doorknob if you are not home as well.


Once you receive your pouches, you are ready to ship!

____

To ship a package, on the main menu, click “create labels.”
The process of creating a label is much like USPS in the states, and is fairly self-explanatory. I will go step by step with you.

STEP ONE

You will select your sender information, which should be saved in your account as your Japanese address.
If your sender address does not automatically pull up, enter it manually. You will enter the various pieces of your “Japanese address” as follows, if the sender entry does not pull up automatically:

STEP TWO

Then, you will enter the address of your recipient.

I won’t include a screenshot for this one, because USA addresses will be entered exactly as you would for any USPS package in the states. Easy peasy!
If you are not shipping to a company and only an individual customer, on the required “company” slot, just click on the line and hit the spacebar to leave it blank.

Address 1 will be the house number, address 2 will be the street name, and address 3 will be the city that you are shipping to. Click register once you have filled out the full address.

STEP THREE
The next page will be your actual contents page for customs. Here is where you will choose the speed/type of delivery you’d like, as well as enter the contents of the package and the weight. Package contents and the weight/value of each item is the same concept as a USPS customs form. Each slot will tell you if it wants the value in USD or JPY.

Now, for a brief explanation of the shipping types as shown above.
***CURRENTLY BECAUSE OF COVID-19, OVER HALF OF THE REGULAR OPTIONS ARE UNAVAILABLE. You will only have the options of International ePacket, Postal Parcel, Small Packet, and Printer Matter. For sending packages, your only options currently will be International ePacket and Small Packet.***

Click on the little question mark for a detailed explanation of each, along with the minimum and max sizes/weights allowed for each shipping type.

____

SHIPPING TYPES:
Thank you to my friend Saaya for helping understand the differences between shipping types!

Postal parcels are regular mail like letters, bills, or cards. This will not be an option you select if you are shipping an actual package. Even if you choose to use this option for small letters/postcards, tracking will not be available.

EMS (Goods) will usually be your fastest option for sending items to the states, and is typically used to send larger items. This option is the most like “priority express” in the states. EMS mail will come with tracking as well as insurance. This will also be very pricey, but has the ability to deliver items overseas in a matter of days instead of weeks. At a bare minimum for the smallest package, expect to spend around $20 for this option, with prices increasing as packages get larger.

International EPacket and International EPacket light are one of the best options for small packages. EPacket will be sent by “air” and will come with up to 6000yen insurance. EPacket light is by SAL (slow air mail) with NO insurance, but does include tracking.

Small Packet shipping will be one of the most cost effective options, but it will also be one of the slowest, and will not include tracking (to my understanding. I will update if this is untrue, but the “tracking number” I received has not updated at all.) You may also customize this shipping type by choosing to add tracking or insurance for an additional fee. These will be chosen AT the post office, not online though, so you will have to be able to communicate that you would like to add these.
So far, I have used chosen to only use Small Packet shipping for my packages of hair bows. I click the regular “small packet” option, then click “air.”
Small packet shipping is available in 3 speeds- AIR, SAL, and SURFACE. They are pretty much exactly how they sound- air mail, slow air mail, and surface (boat) mail, respectively. The difference on price is honestly quite tiny, so I have always gone with air mail.

(Currently it sounds like air mail is the only option due to Covid-19, for both ePacket and Small Packet shipping.)
You can use this tool to estimate your shipping costs for the various types of mailing.
When using the tool, if you are in Misawa you will be shipping from “Aomori.”
Calculate your package weight (after completely packed, remember that packaging materials will always add weight) in GRAMS, then select which country and state you will be shipping to. You will then see an estimate for all of the available shipping types. If you click on the question marks beside shipping types, you can also see the limits for package sizes. Note that there are both maximum AND minimum sizes for shipping.

____

Next, you will enter your content descriptions. I took a package to the post office last week with a simple description in English of “hair bows” but it caused a bit of headache for the postal worker, as she was unable to read the English had to translate it and key it in manually. If sending to the USA, you MUST have your contents listed in English, though!
If you write your contents only in English with no code added, I would recommend bringing in a translated sticky note of what your contents are.
There is a line for the harmonized system (HS) code- filling this in may make the process easier too.
Here is the HS code list for customs forms if you would like to look up your own code. You can also search for the code on Google.
For example, my hair bows have a HS code of 9615900.

Be sure to accurately describe the quantity, estimated value, and description of all of your items in the customs form.
When you have finished adding items, hit register and certify that you are not sending hazardous materials.

STEP FOUR
Enter your shipping date. Be sure to pick the day you will actually be shipping the items out from the Post Office, not just the day you print your customs form.

Next, enter your gross weight. This will be the total weight of the package after all packaging materials have been added. I don’t typically weigh the package until it is sealed and the adhesive pouch is added to the outside. I typically add about 8 grams to this total for what the customs forms themself will weigh.

Once you add your gross weight, you will see the shipping cost. This row will also tell you if your package has insurance automatically via the shipping method you selected. If no insurance is listed, and the option is not available to add online, you can ask for insurance at the post office counter if you would like to add it.

Next, you will select if you want an invoice printed or not.

Then you will declare whether your products have commercial value or not. I am still somewhat unclear on the process of tarriffs in regards to us being USA citizens sending to the US. If you have questions about this one, I won’t give you a recommendation either way- contact a tax professional so I don’t mess up your business haha.

After this, you will select how often you want to be notified of the progress of your package, and how often your customer wants to be notified.

When you are finished with all of this, hit submit.

Hit “register shipment” and BAM. You have created your first shipping label.

IMPORTANT: YOU MAY ONLY PRINT YOUR CUSTOMS FORMS FOR SHIPPING ONCE. Make sure your printer is turned on and ready to print before you actually hit print. If your ink messes up or the page refreshes before printing, you will have to cancel your shipment and redo it. The “reprint” option is only for your own records, it does not work for shipping at the post office once your initial forms have been printed. Be sure that a bar code has printed on your document. If there is no bar code present, you likely have printed a copy, and not the original.

Print all your required documents, and you are ready to head to the post office!

Do NOT put the forms in the pouch yet, and DO NOT seal the pouch. You will present your forms and your package to the postal worker, and they will put them inside the pouch for you. You will likely have to fill out one more certification form at the post office stating that you are not sending hazardous materials, and will have to sign and date 1-2 forms at the time of sending.

Once you present your package and documents, they will scan the package into the system, and you may pay for your package.

Viola! You have shipped internationally through Japan Post.

___

Tracking can be found on your main menu under “shipping history.” Select the shipment you are looking for, and click “track and trace.” You will then be able to see any updated tracking information for your package, if the package comes with tracking!

I hope this has helped you better understand how to begin shipping through the off base post office. It is a process to figure out via trail and error, so you will likely have to do a little of your own research to figure out which shipping method works best for what you are looking for!

If you have any questions, feel free to DM me on Instagram @joyfulcrew! I am a little slow to respond to messages sometimes (three kid problems, right?) but I will always help however I can!

Happy shipping!

Japan Life · Japan Life Updates · Misawa Guides · Our Life in Japan · Travel Guides

Cherry Picking- June 29

Oh my goodness was this a short, fun little day trip. All you can eat fresh cherries for 40 minutes on a warm June day. Can you beat that? 

Here are the coordinates directly to the parking lot- it is a very small shop with a couple vending machines on the side. It is right on the corner of several streets. The owners were super friendly, despite our inability to understand how the process worked. Ha.

40.405600, 141.325477

Disclaimer: Like I said, we didn’t realize how this process worked, so we unfortunately did not realize that you are not supposed to bring a container inside the picking area with you. This is an all-you-can-eat-only kind of deal, then you can purchase cherries in boxes afterwards. When they didn’t hand us any baskets, we assumed we were just supposed to bring our own, and grabbed a Daiso basket from the car.

Thankfully Henry didn’t pick MANY cherries, but we still felt so bad bringing a bucket to the front when they didn’t charge us for them.

The Japanese hosts were so kind to us when we brought out a small container of cherries that Henry had picked, but we felt SO bad that we didn’t realize that we were only supposed to eat freely while in there. With our blueberry picking experience last year, you could pay for the weight of whatever you carried out, so we assumed we could do the same here.
Don’t be us. There are flats of cherries that you can buy afterwards- don’t carry any out on your own!
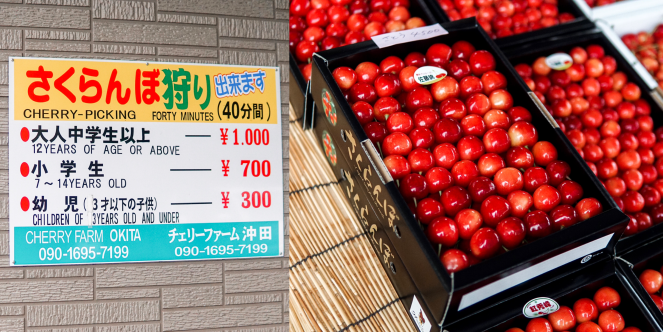
Entry fee is 1000 yen per person for 40 minutes. It is somewhat unclear from the signs/what they charged us on exactly how much kiddos cost, but they are CHEAP either way. They were kind enough to allow our babes in for free.
During those 40 minutes, you may eat as many cherries as you would like.The cherries are THICK right now, as of the last week of June. You will leave that area with a stomach ache if you eat the entire time- I promise. And they are SO good. I took photos most of the time, and still ended up feeling full when it was time to leave. 

Let me say it again, the cherries are SO good. Like, can I say it 4 times? I was shocked to even see some dark, rich bing cherries on a few trees. Do y’all realize how much those babies cost at the grocery store in Japan?!
The branches hang LOW, so even a kiddo as little as around 1.5 years old could easily reach the branches.

AND… the best part?

It’s all COVERED by greenhouses! It started absolutely pouring while we were picking, and all of us stayed nice and dry.

If you look closely, you can see the pouring rain in the background. SO nice that the trees in the picking area were covered, so the kids stayed totally dry.

Basically NO bugs. Grass is very short. Seriously the easiest place for a fun day trip with even very young kiddos. Vending machines are also located to the side if you end up going on a hot day. I would highly recommend this for ANY age.The drive from base is about 57 minutes without tolls, but it is a BEAUTIFUL drive. I am not sure if a toll route would change this, but I HIGHLY recommend the route that Google Maps took us while avoiding tolls. 

The Japanese asked us to come back as we left today, only after taking photos of our kids and gifting us a small bag of cherries for free. We will absolutely return. I’m tempted to go back again tomorrow, honestly.Make sure you check them out too, you won’t be disappointed.

Japan Life · Japan Life Updates · Misawa Guides · Our Life in Japan · Travel Guides

Cherry Blossom Guide – Misawa City, Aomori

My first cherry blossom season in Misawa was spent wandering about pretty aimlessly, trying to figure out where the best places to view cherry blossoms were. I stuck mostly to base, because I was really afraid of accidentally wandering somewhere that I wasn’t necessarily welcome. And don’t get me wrong there- the blossoms on base are totally worth driving around to see. They are so beautifully and strategically planted, and they are some of the trees that seem to bloom the soonest. As I have explored more of Misawa, I have found that very few places seem to be unwelcome to Americans, as long as you are respectful, clean up after yourself, and don’t let your kids run completely wild. On the contrary, the Japanese at the parks seem to absolutely adore respectful American kiddos.

Icho park last year, mid-week. (If you go on a weekday, or early in the morning, it is beautifully quiet here.)

Last year, I thought the only place to really see blooms was at the Statue of Liberty (Icho) Park. I missed out on some of the most gorgeous blooms, because I spent ALL my time there (also because I had mini sessions nonstop, which was AMAZING, but also so draining.) It definitely is one of the best. But I wish I would have known about all the available parks for blossom viewing within like 20 minutes of base, where to park, and where was the most kid-friendly.

My kiddos were sick this week, so I will be updating this post in the next couple days with more photos and more information about each park.
For now, here are some photos of VERY early blooms that I saw at a couple parks I have visited this week- which will be updated soon! (April 24 update.)


 Also, here are a few reminders for you about being kind to our Japanese hosts, please don’t take these tips lightly! They may be common sense to most, but I have seen them all happen, which is why I include them.

• Please don’t let your kids pick cherry blossoms or any flowers, for that matter (and don’t pick them yourself.) If you want ONE blossom for a photo or something, that is one thing. But these gorgeous blooms don’t last long, and it’s incredibly sad for me as a photographer to watch other kids stripping entire branches to throw them in the air for one photo, you know? Be smart, and realize that there are a lot of people trying to view these trees in a very tiny amount of time, and half the time a giant rain or winds will strip the branches, anyway. If you want blooms, pick up ones that have already fallen!

• If you go to a dog-friendly park, PICK UP AFTER THEM. Keep your dogs on a tight/close leash, don’t let them jump all over people. I’m a dog lover, but I am absolutely a supporter of keeping your dogs at home if they growl at people or easily escape a leash.

• Try to keep your kiddos under control. Parks are obviously for running and fun (I have a toddler, trust me, I get it,) but I have seen people be drilled in the head with soccer balls by American children at these parks. Realize that these are THE ONLY parks for local Japanese families, and we are visitors in THEIR country.


Lastly,
Komaki and Tateno are VERY close together and could easily be hit in the same day.
Swan and Icho Parks are also VERY close together.

Also, as a disclaimer- these are all Google Maps pins. I know sometimes the difference between Google Maps and Apple Maps can be huge.

1. Statue of Liberty Park (Icho/Oicho Park)

(40.610026, 141.439702)
TONS of blooms here. The entire park is covered. 

If you go early in the day, you can park in this lot that the pin takes you directly to. I have always been routed through a very tightly-packed residential area to find the park- it will seem like you are going the wrong way if you are routed this way too. This lot does fill up quickly though, so if it is filled, you will have to take a right out of the parking lot, and drive until you see a one-way street. This will take you to a loop that drives directly above the park (directly above the playgrounds.) When the actual parking lots are filled, overflow parking has always parked on the grass above the park on this loop. I personally do not park here unless I see a JN (non-Y plate) car already parked there, just to be sure it is okay.

• stroller friendly almost completely through, almost all of it is paved walkways
• great place for a picnic when it is not insanely busy
• HUGE State of Liberty
• playgrounds, swings
• completely open areas for kids to run
• giant roller slide
• dog friendly
• large and beautiful lake
• fishing friendly
• has restrooms

This is one of the very best parks to visit for lots and lots of cherry blossoms. There are even a few different kinds of blooms here.
That being said, it gets BUSY towards the end of the day, and especially towards the afternoon on the weekends. During full bloom, the place is sometimes PACKED. It’s sometimes hard to find a parking spot, and the parking in this park is a little squirrely sometimes. I recommend visiting Icho for SURE, but recommend going during the early morning, or on a weekday. (Sunrise in Icho is spectacular, you NEED to see it.)

2. Swan Park (Hachinohekitakyuryoshimoda Park)

(40.611883, 141.401523)
TONS of blooms here. The entire park is pretty much covered.

This is the one park I have not visited yet- I will update this description in a little more detail in the next few days. You can Google images, or search Misawa Asks for more info on this one. (Swans come out in the winter, so don’t expect to see them in the spring haha.)

NO DOGS ALLOWED
• large and beautiful lake
• playgrounds
• has restrooms

3. Train park (Central Park)

(40.683702, 141.370212)
Lots of blooms, small park but pretty heavy cherry blossom coverage 

This is a very small parking lot, and make sure that you do not park in the Library parking lot on the other side of the building. They are pretty clearly marked.
This one is a family favorite of ours- it has a huge stationary train that our toddler LOVES to walk through. Lots of playground equipment- but it does get relatively busy because it is such a small park, and it is right in the middle of town. The blossoms are gorgeous here, though! Great 5-10 min walk, or like a 1 minute drive from base.

• stroller friendly on the outside perimeter, but this one is so small you probably won’t need to bring strollers
• playground
•  walk-through train

4. Tateno Park

Main parking lot by scenic area- (40.6155691, 141.3323448)
Dirt lot by the playground side of the park-
(40.611648, 141.330215)
TONS of blooms here, and lots of different kinds of cherry blossoms. Do be aware that some trees bloom at different times, though- so all trees may not be in bloom at the same time

I personally park in the dirt lot by the lake (it is located directly next to a huge and beautiful shrine tucked into some pines. I am not 100% sure this is parking for the park, but it was closest to the park that I wanted to explore, and was not full- so I considered it safe to park there.)

• stroller friendly for the most part, some paths are not paved, but are smooth enough to navigate a stroller over
• playgrounds/play equipment, swings
NO DOGS ALLOWED
• large and beautiful lake
• tons of picnic areas/ grills available
• fishing friendly
• has restrooms

Lots of lower hanging branches here, and a VERY pretty picnic area in several places in the park.

I could be wrong about this park NOT being dog friendly, but I am almost certain I saw signs posted saying pets were not allowed. I will update if I find this to be incorrect.

I have only visited this park once, and have not gone to the half that is not right around the lake.
It was BEAUTIFUL when we visited, and would be perfect for a picnic. There are several tables, lots of places to sit down for a snack, and LOTS of places for kids to run. The place is absolutely huge, and if you have loud and crazy kids- I would say this or Train Park would be your best bet.

This park has 2-3 different areas to it, and it is the PERFECT spot for a picnic.

5. Komaki (Komakionsen Shibusawa Park / Hoshino Resort )

Train station side parking: (40.667054, 141.353918)
Hotel side parking:  (40.663124, 141.354045)
(I usually park at the hotel, then walk down to the other area near the train station.)
Less cherry blossoms, but enough to make it worth visiting- beautiful during literally any season/any month

• completely stroller friendly
• dog friendly
• foot onsen
• big red Japanese style bridge
• lots of Japanese style buildings & shrines
• large and beautiful lake

Buildings on the hotel’s side. The umbrellas were set up for a festival of some sort. There are often festivals held right on the lake.

Train station side, these gorgeous and HUGE white blooms appear before cherry blossoms are in full bloom.

Komaki is a little less kid-friendly in the fact that it is usually VERY quiet, and there aren’t open spaces for kids to run. When festivals are going on here, I would say it is much less quiet, though.
Komaki area has two small parks- one right by the train station, and one by the hotel and onsen. (The onsen is no longer open to non-hotel guests.)
The train station side of the park has a lot more open space, but is much smaller- if that makes sense- and generally has less people occupying it. There are also FAR less cherry blossoms on this side- if any. (I will update this with certainty when I return after full bloom in Misawa.)

Hotel side-
When you park in the parking lot that the pin takes you to, it is REALLY confusing the first time that you try to find the scenic area. You will park in the lot, and see a bunch of hotels & buildings. (If you pull up Google Maps, you will see a lake. If you simply navigate yourself to the lake, you will find the loop easily.)
If you don’t have Maps readily available, walk into the building area. You will take a right before the main building, and will walk past a couple parking lots on your right. Once you go under the arch, you have found the scenic loop, and the foot onsen is directly to your right, overlooking the lake.
Our kids love this park because they are pretty quiet and calm kiddos, and like to just take stroller walks. If you have children that are excessively rambunctious or like to run, I actually don’t recommend walking the loop with them, simply because Komaki isn’t a park, just a gorgeous paved loop around the hotel. The hotel is just kind enough to allow non-hotel guests in.
That being said, there are miniature ponies and horses that are very friendly, and the entire place is gorgeous and interesting for kids- just maybe not the best for toddlers or kiddos that can’t be relatively calm while outside.

The foot onsen is open to the public, but please be respectful and quiet when using it.

I would consider Komaki more of a scenic walk/ cultural experience vs. a park. Cherry blossoms are supposed to be gorgeous here when in full bloom, though.

There is also a small bamboo forest on the train station side. And there is always BBQ sauce on Henry’s shirt. Haha

I hope these recommendations help you some! Even if you don’t visit during cherry blossom season, these parks are our absolute favorites to spend time at in Misawa, and are the best to get your family outside of the gate for a day. Hope you enjoy them as much as we have!

signature(heart)

Japan Life Updates · Misawa Guides

Morioka {Iwate, Japan} – January 4-5

Drew randomly mentioned leaving home for a little getaway this weekend, and if I’m being honest, I really was dreading going on Friday night. My husband is a fly-by-the-seat-of-his-pants kind of guy, while I’m a planner. I wanted to have our hotel and train tickets booked a week in advance, and when we didn’t, I assumed we weren’t going. Friday afternoon rolled around, and Drew simply came home from work and asked when we would be leaving.


That’s one of the greatest things about Drew- and just one reason I’m so glad I married him. With two kids under three, he doesn’t even think twice about loading everybody up on a train and taking a fun weekend trip in the dead of winter.

And I’m so glad he thinks like this.

Morioka is a gorgeous little town surrounded by mountains. The weather this weekend was PERFECT (upper 30’s) and we were able to have the kids outside for most of the weekend without worrying. I wore Ellie in my LilleBaby, and Henry rode around in his stroller.

Man, I’m telling you. Traveling with kids is really not nearly as hard as you think. I’m definitely exhausted after this weekend- but when you take the right steps to prepare for having little ones with you, traveling is so much better with them than it would have been alone.

We only spent two days in Morioka, and we visited a few different coffee shops and restaurants (I shared a bunch of them on my Insta Story highlights under the explore Japan tab) but two main things stuck out to me from the weekend.

If there are two things you need to do in Morioka, these are them:

Round 1

If you go to Morioka, especially if you have kids, you shouldn’t leave without visiting  here. Honestly this is where we spent the first half of the day on Saturday, and I could have spent the entire day there. In a nutshell, Round 1 is a massive indoor play arena, with SO many different games and activities to enjoy. It’s like an amped-up Chuck E Cheese that is also fun for adults.

It has like 6 or 7 stories of bowling, batting cages, soccer fields, ball pits, bounce houses, skating rinks, pool halls, and arcade games.

We spent 3 hours in there and could have spent a solid 3-4 more, since we only explored like two levels of the place.

On top of that, it was only $30 for Drew, Henry, Ellie, and me. Once you get your bracelet inside, every game and activity is completely free, and honestly it wasn’t that crowded at ALL. Talk about cheap fun for your kid, right?

There is all sorts of food there, and again in regular Japan fashion, you can buy beer right in the middle of the place. So funny to see the equivalent of an American Chuck E Cheese selling steel cups of beer.

There are lockers on the first floor that you can utilize for free, and since we walked from the train station, we also had Henry’s stroller. Japan is amazing in the fact that we just left his stroller on the first floor by the lockers for three hours, and it was completely untouched when we came back.

Wankosoba

I was SO confused at first when I started hearing about this soba restaurant. I assumed it was just like yakiniku or shabu shabu (which are both all-you-can-eat style restaurants.) In reality, this restaurant was more like a game.

We had somewhat of a language barrier at first- but in hindsight I much better understand how to do it.

The object of the game is to eat 100 bowls of soba. When you walk in, you will see the Japanese people sitting at the low tables, absolutely inhaling bowl after bowl after bowl of soba.

You will walk in, and take a seat at a low table. You are assigned one server who will be at your table for the duration of the meal. The server, as seen above, brings out around 20 bowls of soba at once. These are bite-sized bowls of noodles. As soon as your bowl is clear, they will pour more noodles into your bowl.

Most of the Japanese that we saw eating would swallow each bite of noodles whole, then immediately raise their bowl in the air for more.

You will continue having your bowl filled immediately until you place the lid on your bowl. Once you place your lid on, the game is over.

The object of the game is to hit 100 bowls.

Sounds easy, right? After all, those bowls are teenie, and each bowl is only like one bite of soba!

Wrong. Not a single one of us made it past 75 bowls. I ate a solid 65, and as soon as you hit that wall, you are so done. We made the mistake of buying the regular soba, while Clint chose right with buying the deluxe. When you buy deluxe, they pile your bowls on the table in front of you. With the regular, you have to just keep track of how many you have consumed by yourself. If we go again, we will absolutely choose the deluxe option.

Because we had the hardest time finding this place- it is directly across from the Morioka train station on the SECOND story! Message me on my Instagram account for the direct pin- but if you search Wankosoba, you should find it immediately!
So worth it, although we all almost died leaving that place with how full we all were.

A few random tips:

• If you have kids, I really think it’s worth it to pay the extra $10 for the “first class” Shinkansen tickets. Green car tickets are maybe $10 more per person, and they are SO worth it. Kids are free as lap children until age 3 on the trains almost everywhere in Japan, so we got the bigger, comfier seats, since we chose to have the kids sit on our laps. Henry fell asleep within 4 minutes of boarding.

• If you have kids and plan to stay in a hotel pretty much anywhere in Japan, get a double room. Honestly, even if you don’t have kids… get a double room. We stayed in the New City Hotel (not sponsored), and while it was very very nice, Japanese hotel rooms are TINY. Having two beds was a lifesaver, and allowed one kid to sleep in each bed with us. The last time we stayed in a hotel, we made the mistake of trying to fit into one “double” bed. Unfortunately double beds in Japan are somewhere in between a twin and a full sized American bed. Not quite what you need for two Americans (one of which was pregnant at the time) and a toddler, right?

Overall, it was a fabulous trip. Totally worth the bullet train tickets to not have to brave the snow, and totally worth a little walking to do a few fun things close to the train station! Easy with kiddos, and a blast for everyone involved!


Misawa Guides

Misawa Newcomers Guide

I will start out this post/guide by giving you a giant WELCOME TO MISAWA!

23845854_10155950451964525_4839590248875840862_o.jpg

I am confident that you will fall in love with Japan if you embrace it for all that it has to offer. You are coming to a relatively remote and rural base that is nothing like Tokyo, but the community here is incredible. The base offers SO many trips and events to make your tour here awesome- TAKE ADVANTAGE OF THEM! Misawa is definitely what you make of it, and there are so many opportunities to make it amazing. Get out of your house, get off base, and enjoy it! I don’t know of many people that don’t ache for this place after they leave.

I have a series of a few posts outlining all I have learned about Misawa so far. We have been here for a bit over a year as I write this, so we are still learning as well. But I felt it would be helpful to compile a lot of the resources that have made life easier for us. This is the main post with my general tips, but please also refer to my other posts about exploring the country/saving money while here!

Saving Money in Misawa

Exploring Misawa & Car Tips

Tips for Remaining Polite

Remember, while you have orders to be here, you are a guest in another nation. The Japanese are SO kind 99.9% of the time, and respecting the culture in Japan is one of the ways to be kind back. Take the cultural tour that is offered to you when you get here! We never got to take ours, and I missed a lot of great information because of it.

  • Be sure to always carry socks with you. Many restaurants and offices require shoes to be off, and being barefoot is considered rude from everything that I have read and heard. I always keep socks in my bag for myself and our kids just in case we find a place that requires shoes to be off and I am not wearing socks.
  • DO NOT TIP. Tipping is generally considered rude, and most of the time if you hand over too much money, they will just hand it back.
  • If you are coughing/sneezing, wear a mask! The Japanese wear masks to avoid spreading germs or getting sick themselves- if you are sick even in the slightest, wear a mask off base. I have been told this even includes a runny nose or allergy-type symptoms. They have them at Daiso for like 10 yen each. (Pack of like 8 for 100yen.)
  • Yen or cards are typically placed in the small tray by the cash register, not usually handed directly to the cashier. But if handed to them, be sure to use two hands.
  • Restaurants do not usually ask you if you are ready to order. We had NO idea of this when we arrived, and were waiting FOREVER for service. Most restaurants will have a buzzer on the table of some sort. Press this when you are ready to order and the waitstaff will come to you then.
  • Most restaurants offer free water, but any other drinks MOST of the time do not come with refills, unlike the states. Some restaurants will serve you water, others will have a pitcher and glasses sitting at a central location in the restaurant.
  • It is a toss up on whether restaurants will seat you or if you will pick your own spot. We generally wait at the door until told where to go if we aren’t sure.
  • Be aware that the Japanese recycle and sort their trash very well. I say this to remind you- when you throw out your trash, be aware that somebody will likely later be sorting it by hand. Wrap up diapers, rinse out your recyclables, don’t put sharp or dangerous items loose in your trash, and sort your recycling if at all possible. There is a reason we have a hazardous waste building on base, pay attention to your guide you get when you accept your house so that you do not create a dangerous situation for a worker.


Making Off Base Life Easier

  • PINS. I had no idea what people were talking about when they talked about pins. GPS does not always work correctly here, and places are often hard to search for when you don’t know Japanese. Also be aware that there is a LOT of American names for places, that aren’t necessarily the Japanese names.
    I.e. if you ask where Yumeya is, nobody may know. If you ask for “cat balls” it’s an easy find from Misawa Asks or Out The Gate. (You’ve gotta’ discover that reference for yourself… also the food there is amazing.)
    If you use coordinates or a pin, you will be able to navigate MUCH easier. Google Maps works best for most people, to my understanding, but I do know a few who swear by Apple Maps.
    Google Maps has a tab for “Your Places.” We drop pins anywhere we would like to revisit, and label them accordingly.
  • Drop a pin directly to the main gate until you know how to navigate the streets right around base. If you try to navigate back to the base itself by searching “Misawa Air Base” in the search bar, it will take you to some weird side street. Having a pin directly on the gate location will take you straight home! We just label ours “home” and have Siri “navigate us home.”
  • Google Translate will allow you to scan any kanji and translate it into English on your phone. It works best if you take a photo of the Japanese text, highlight it, then translate it. Also if you are out of data on your phone, it probably won’t work.

Fresh Food & Produce Secrets

  • 9’s Market (Veedol Plaza)
    This is a farmer’s market that occurs on the 9’s of each month. (9th, 19th, 29th) This is TOTALLY outdoors though with small tents set up, so I recommend making sure you are prepared for the weather! I always take my toddler in a stroller/wear my baby.
    Much cheaper fruit and veggies than on base at times, they sell fresh (and beautiful) flowers, plants, fish, and sometimes fried foods. Beware, one of the popular stands looks like pancakes but is actually a sort of miso tofu.
    Cash only, they CAN make change for big bills but it’s always nice to have small change. I usually don’t spend more than 1000-2000 yen here, so I bring coins. Open in the rain and snow too, usually the parking lot is the most free around or after 9am. They usually pack up by noon-ish. If you come around 11, lots of the stands will make you good deals. The biggest produce stand very often throws in produce for 100 yen if I buy something around 11am.
  • Green Roof Market (directly outside of base)
    This indoor grocery store sometimes has INCREDIBLE prices on produce. I always check here for watermelon in the summer, and pumpkins in the fall. I have also heard they discount produce on Tuesdays, but I somehow haven’t made it on a Tuesday to check. I believe they are cash(yen) only.
  • Aeon Mall Shimoda (bottom floor of Shimoda Mall)
    There are several markets on the bottom floor of the Shimoda Mall, and the biggest Daiso in town right around the corner too. The market across from the actual Aeon grocery store is USUALLY the cheapest. I always browse both sides before grabbing a shopping cart and buying anything. There is also a side with all sorts of meats for sale. The fruit and veggie market only accepts cash(yen).
  • “Apple Lady” (by the train station)
    There is a small garage that a sweet Japanese woman sells apples out of right by the train station. If you take the first left coming from base to the train station, you will see a big apple sign. The apples are AMAZING. Cash(yen) only, and be prepared to usually buy a LOT of apples if you purchase from her. Most of the time they are sold by the crate. I have a group of friends that usually split a crate, making it super cheap and the perfect amount of apples. Aomori is famous for its apples, and I’m telling you, they are SO GOOD.

Cool Family Tips

  • If you are a nursing mom, many malls and bigger buildings have “nursing rooms” to use instead of a family bathroom. There are areas where you can breastfeed, change your baby, and there is even hot water for making a bottle of formula!
    Most restrooms also are equipped with “kid holders” so you can wrangle your toddler while you relieve yourself. Take note of that, America!
  • If you are pregnant, most parking lots consider you “handicapped” and you are allowed to park in the parking up front. There is usually a sign with a pregnant lady on it.
  • Almost every mall has the fun “car” carts for free. In the states you often have to buy these for $1-$5, but in Japan they are totally free to use. Most malls also have lockers that you can rent so that you don’t have to carry your purchases with you through the mall. Shimoda’s lockers are on the bottom level just after the supermarket. Lifesaver when you are hauling around kiddos.
  • If you are ever somewhere with kiddos in the winter, and are pretty cold, almost EVERY Lawson’s/Family Mart/Seven Eleven will have hot beverages! Hot chocolate or a hot coffee can warm you up any time. Vending machines also offer hot drinks if the button is RED. Blue buttons mean the drink is cold. Vending machines are everywhere, and they are usually really cheap. If you have super hungry kiddos, they often even stock the vending machines with soup. (Corn soup is the STUFF.)

23244382_10155893984109525_8443494698206065809_n.jpg


General Tips

  • You will be trolled on Misawa Asks. Embrace it. Learn to GIF in return. Use the search function before asking a question. NEVER ask for the number to Pizza Hut. You’re welcome.
  • The Mokuteki’s pizza is by far the best. They can sometimes be on the slow side though, so if you need something quickly, I recommend calling ahead and ordering for pickup.
  • Check out ITT and the 35FSS websites. They both have AWESOME information about trips, festivals, events, and tons of stuff that you can do- accompanied or unaccompanied! ITT trips are absolutely worth it- I haven’t been on one yet that we didn’t love.
  • You can reach just about any number on base by calling the operator. I don’t usually mess with dialing a number directly because it usually doesn’t work for me for some reason. Call the operator, press 1 for English, then 0 for the operator. Then ask for what facility/shop you need, or tell them the number you’re trying to call.
    Number: 0176-77-1110
  • Store the emergency number as a contact in your phone. If you are in a situation where you need to call quickly, it is so much easier to say to Siri “CALL EMERGENCY” than try to remember the long number.
    Emergency number for off base or from a cell phone: 0176-53-1911
  • Beaches off base have iron in the sand. It will stick to you badly, and will also ruin suits/clothing. The sand is mildly magnetic, so I recommend NOT taking your devices to the beaches with you if you will be in the sand. It took me a long while to get sand out of my Apple watch when I made that mistake the first time.
  • You will see lots of the pretty glass orbs around base. Fishing floats can be found at lots of the beaches around Misawa. People are typically pretty secretive about how to find a float, but if you search enough posts, you can find the good tips.
  • The Japanese have lots of holidays where most everything in the country will shut down. The two major ones I have noticed are New Years week and Golden Week (usually during April.) Just be aware that places like the car mechanic or insurance places off base will be closed (and your car WILL break during that week) and places like the mall or the gelato place will be PACKED. During these holidays, many places and services ON base are shut down as well. Plan ahead for these!
  • The AFRC will be your best friend if you are a new family here. I have called them for SO many questions. They have awesome classes and information seminars monthly that can help with a variety of questions. Their staff at this particular location is SO helpful. If they don’t have an answer for you, they will find somebody who does.
    Also you are free to make copies/print pages there for FREE (reasonably- don’t print a million things. I believe the limit is 10?)
  • I do not personally recommend downsizing before you leave the states. We got rid of SO much, and had to buy it again when we got here. The furniture store here is excellent, but any furniture stores off base will have MUCH smaller furniture than you are used to. I recommend buying ANY items that you’d like furniture wise before you leave the states. You can always sell things on the buy and sell pages once you get settled into your home if you do not have space.
  • I also state this in my exploration post, but I think it is important enough to talk about twice. Do not drink at all if you are driving. I know this sounds self-explanatory, but Japan is NOT like the states. One drink is likely already over the legal limit of .03. If you drink at all, have somebody else drive. The penalty off base for drinking and driving is extremely harsh from everything that I have heard- Japan really doesn’t mess around with drunk driving.
    Also, public drinking is totally normal, so don’t be startled by that! People will be drinking beers on the trains, walking down the street, and in cars (as long as they aren’t driving.) Almost all festivals sell beer at their booths!


I will add more to this guide as I think of it, or as y’all suggest additions! I hope this can be an awesome help for newcomers for years to come. Misawa is a pretty special place, and I hope you fall so in love with the base, the city, and the country of Japan.

Welcome to Misawa!

Misawa Guides

Exploring Misawa & Car Tips

24059558_10155971680884525_14014885808045303_o.jpg

JCI Information

JCI is a complicated process which basically boils down to the inspection and licensing of your car. Japan is definitely much more thorough than the states from everything I have experienced. It can be a HUGE stressor for some families, and can cost a pretty penny to get your JCI renewed. (I have seen people pay as little as $200-$300 if they do it themselves, or upwards of $800-$1000 if they go to somebody for the JCI inspection.) Most vehicles here cost anywhere from $500-$4000, so often people simply junk their vehicles if the repairs are too costly. When you purchase a vehicle from a buy and sell page, considering how much longer the JCI has left is a good idea.
This is why most do not recommend bringing your vehicle from the states to Japan. I won’t get into this here because it is a matter of opinion and preference, but definitely use the search bar in Misawa Asks to learn more about JCI inspections and the pros/cons to bringing your vehicle with you if you are considering.

My biggest tip for car maintenance that some don’t think about? Wash your car once a week if you can. Cars will fail a JCI inspection because of a rusted bottom, and if you have never lived in constant snow, you don’t realize what damage the road salt can do. Cars may look beautiful on the outside, but the salt will rust out the bottoms very quickly.

24210211_10155971682004525_7012655009874022387_o.jpg

Car Safety & Winter Tips

There are summer tires and winter tires, and most cars that you purchase here will come with a set of each. Of course a set that is already mounted to rims is way more convenient, and makes the process of switching between the two much easier. The base will publicize what date your winter tires HAVE to be on by. Please realize that having good winter tires really is super important. In addition, you can actually get in trouble if your winter tires have crappy thread and you get into an accident. It’s best to just spend the money and make sure your vehicle has excellent winter tires that will provide decent traction on the snow and ice.

Keep an additional set of coats, gloves, hats, and blankets in your car at all times. One for each family member if at all possible. While it may seem redundant or silly, it is cold here, and it is snowy. It can be sunny one second, and then drop 7 inches of snow in an hour. If you didn’t know, Misawa is the snowiest base in the Air Force, and Aomori is the snowiest city in the WORLD.
Always be more prepared than you think that you need to be. I put our set of coats in the car at the end of September, because it can randomly snow/get cold very early in the season. I can’t tell you how many times I have thanked myself for doing so.

Police ALWAYS have their lights on. I thought I was being pulled over the first time one came up behind me. Sirens mean pull over/get out of the way. Lights are just regular patrolling.

Cars WILL stop in the middle of the road with their hazards on. Like… anywhere. Always be super cautious of this, because sometimes they are somewhat hidden. Pedestrians are also extremely common in Misawa- very very many people walk or ride bikes in the town.

Most Japanese back into parking spots. If a car in front of you suddenly stops and turns on their hazards, give them space. They are likely backing into a parking spot off of the road. When you park, it is common to fold your mirrors in. If you forget, the Japanese often will do it for you. Parking spots and streets are NARROW, so this makes it easier to avoid clipping another’s vehicle.

Do not drink if you are driving. I know this sounds self-explanatory, but Japan is NOT like the states where some can still have a beer and legally drive. One drink is likely already over the legal limit of .03. If you drink at all, have somebody else drive. The Japanese take drinking and driving VERY seriously. The legal drinking age here is 20, and the base chooses to follow the country’s law here as well.
Also, public drinking is totally normal! People will be drinking beers on the trains, walking down the street, and even in cars (as long as they aren’t driving.) Most festivals that you attend will sell beer at the stands that they have, and chu-hi’s are actually pretty delicious here. (Like a Mike’s Hard. My favorites are pineapple and peach.)

Some roads will not have a speed limit sign whatsoever. I usually follow the flow of traffic in these situations, but here is a general guideline for driving off base if no speed limit is posted. The Japanese have very little tolerance for speeding from everything that I have heard, and if you get pulled over, warnings are usually not a thing if you were speeding. If it is posted, follow the signed limit. The Japanese will pass you often, but we have never had an issue with driving the posted limits.

Screen Shot 2018-12-19 at 4.32.32 PM.png

During the winter, expressways (toll roads) will have signs updated digitally. They aren’t always the best at updating these from what I have seen. Don’t drive fast if it’s icy- duh.

ALSO: Please be aware that no matter what GPS you use, to my understanding, the maps do NOT update to let you know a road is closed due to snow/accident/etc. If you are traveling during the winter, it really is best to take the toll roads and just dish out the money, or take the trains and avoid driving all together. Trains can be relatively expensive, but the toll roads usually aren’t too bad. We tried avoiding tolls one time on our way to go snowboarding in Aomori, and ended up being stopped by a 9ft wall of snow that had been plowed into the road. We drove 45 minutes down that road, and had to drive all the way back when we realized it wasn’t passable. The toll roads will cost some yen, but you can almost always guarantee they are passable. You can typically search Misawa Asks to find out how much each toll road will cost, and you will also learn what back roads DO stay clear.


Misawa Guides

Saving Money in Misawa

When you first arrive in Misawa, you may be startled and discouraged by many of the prices you see. Produce was the first thing that disheartened me, because I am a watermelon girl for life, and definitely wasn’t used to seeing them for $17. There are several ways to save money in Misawa though, it just takes a little while to figure out all the tricks. Between COLA and shopping smart, you can still easily survive, and even save money while stationed here, no matter what rank you are.

23800095_10155950450869525_4377749034539187959_o

Buy AC units during the winter months

If you PCS in sometime other than June-late August, BUY AN AC IMMEDIATELY IF YOU SEE ONE. Check all the buy and sell pages- there are at least 5 of them. If your home is equipped with AC- you are awesome, and you kind of suck, but you can ignore this. But if you do not have AC in your home, I highly recommend buying one during the cold season.
During the winter you can find AC units for as cheap as $40-$50. If you try to purchase one in the melty months of summer, you might be paying $500-$600 per unit. Two units are allowed to be on at one time on base. Pro tip: We own three but ONLY ever run two at a time. The base is very strict on this- those things suck energy like mad. But this way we are able to have an AC unit in each kiddo’s room upstairs for sleeping at night, and one downstairs for during the day. We only ever run two at once, but this keeps us from having to move them up and down the stairs. It can be miserable with kids if you do not have an AC during the hottest months, so make sure you plan ahead.
Also… dehumidifiers are your best friend, and will also be WAY cheaper during the winter months. You won’t even realize how humid it is here until your hair starts moving towards the stars and black mold starts appearing in your bathroom like your kid splattered paint on the wall. I highly recommend keeping your bathroom fog fans running 24/7. We have left ours on since we moved in, and I have seen no mold yet.
Daiso has small dehumidifier bags that you can purchase, and DampRid works very well for closets. (I linked the ones I buy from Amazon below, they are my affiliate links.) I use these hanging ones for my closets, and put the buckets in my cabinets behind towels or food where my kids can’t reach them.

Take advantage of the thrift store-

IF YOU ARE E4 & BELOW, TAKE ADVANTAGE OF THEIR PROGRAMS!
For E4 and below, when you first arrive in Misawa, you are eligible to receive $50 of free merchandise during the first 90 days after your arrival. Make sure to bring your ID and a copy of your orders if you’d like to sign up for this. You will also receive $25 for free to spend each month in the thrift store at these ranks. I buy ALL my kids’ clothes and toys here, then donate them back when I’m done with them! This was a total lifesaver too while we were waiting on our home goods shipment to arrive.

Join and use the Misawa Free Stuff page

Seriously, people give so much stuff away here. This is also an awesome way to get rid of anything you need rid of quickly! When people PCS out, they often leave boxes of cleaning supplies, toiletries, spices, and canned food outside of their houses and will post about it on this page. If you are just coming in, and are still in TLF, this is an awesome way to get some basic items like shampoo, spices, cleaning supplies, or soups for the waiting period until you get assigned to your house and purchase a vehicle.
If you are getting rid of something decent or still functional, post it on the page! Even if you just drop it on your curb- somebody may want it, and I hate seeing how often things go straight to the dump. Almost everything I have placed on my curb and posted about on this page was rehomed to another family vs going to the landfill. Win-win.

Research the Japan Explorer Pass

I will leave this very up in the air with that term “research,” because there is a lot of controversy on whether or not service members are allowed to use this. Basically, this is a discount flight booking website for traveling to lots of places in Japan, including Tokyo. Offered through Japan airlines, it is used to encourage the exploration of Japan, and to encourage the spending of money along the way, of course. To my understanding, JAL has initiated it in order to encourage tourism and commerce within the country.
Flights can be as little as $99 for round-trip, which is often less than half of the price of same flight if purchased from a regular commercial site. Lots of my friends have successfully used it, and state that their orders serve as their “return ticket.” I won’t tell you to do it or not, but I will say to read up on it! Either way, family that visit from the states are DEFINITELY 100% allowed to use this, and it saves a TON on the flight from Tokyo to Misawa, and the flight back.

Take advantage of the rotator
(Also called: the hop / the Patriot Express)

I have yet to do this, so I really don’t have a ton of information on the exact process here at Misawa, but realize that you are often able to travel Space A on the rotator when it returns to Seattle. The regular price for that international flight can be crazy expensive, especially if you have several in your family, making it hard to afford a return trip to the states. If you are willing to gamble on whether or not you will get a seat for all your family members, or if you have super flexible dates on travel, you can save thousands by “hopping” on this flight. Do be aware that there are different categories of who gets preference on seats, and that there are no “lap children” when it comes to this flight. If you have 6 infants traveling with you, you’ll need 6 seats. (I hope you don’t have 6 infants traveling with you. If you do, God bless.)

Take advantage of the exchange rate

Especially on larger purchases, you can very easily save/make money using the exchange rate. Pay attention to the rate each day.
The exchange rate for USD to yen is the best at Sky Plaza, directly outside of base. There is a small little machine that you insert your money into, and it converts it for you. The exchange rate will always be better off base.

Become a club member

Especially if you are enlisted, and especially if you are a lower rank, club membership is CHEAP. The club puts on a free dinner once every month, always on a Wednesday. As a family of four, we probably save a total of $30-40 each month on that dinner alone.  Eating out as a family is expensive, and if you have kids it’s totally worth it to be a club member. Membership also gets you various discounts on other meals. We only pay around $4 a month for our membership, and just make sure to go to the dinner every single month! The membership fee will be based on your rank, so it may differ slightly based on that. Download the Member Planet app, and you always have your membership card on you!

img_2156

Shopping Tips

There are soooo many ways to save money or shop better while overseas. Not having a Target in your back yard is pretty heartbreaking, yes. But I will also desperately miss Daiso when I return to the states. Here are a few shopping tips that I’ve found helpful:

Sign up for Amazon Japan-

Having Prime for Amazon Japan is WAY cheaper than in the states, and it will deliver to your front door on base. We choose to pay for both our American Amazon Prime as well as our Amazon Japan Prime. Prime for Japan only costs around $3.50/month (400 yen) and you will get a discount on top of that if you choose to buy a year in full.
Make sure you use Google Chrome and choose to translate it automatically while shopping. If you do this AND set your settings to English, it’s pretty easy to shop. Some items tend to be outrageously priced, but most are just like you would find on the American Amazon. I have ordered shelf hardware, earpros for the kids, and even a computer charger from there. Overnight or next day shipping to my door, even on base. Totally worth it for me to not have to go pick it up at the Post Office!
ALSO, most Japanese sites that you shop from will allow you to pay cash on delivery if you choose to. I always try to have exact change if possible, but the post office delivery people do carry change. I have done this a couple times, as Amazon Japan can be kind of weird on accepting credit cards at times. Only ever use Visa, and if you are not using USAA or Navy Federal, you should probably place your order in USD and not in Yen to avoid foreign transaction fees.
Here’s how to enter your address on Amazon Japan: (it’s a little different than how to enter your address for any other Japanese site for shipping it straight to your door. Search Misawa Asks if you have any questions on other sites.)

First and Last Name
Misawa Air Base
Misawa-Shi
Building #, Apartment #
Aomori-Ken
033-0012
Japan

Click on the banner below to take you to the page for signing up for Amazon Prime in Japan. This is my affiliate link, but also the direct link to the Japanese Amazon site. You can shop easily through their site anytime by typing amazon.jp instead of amazon.com.

Also remember that if you are a student (high school or college) you can get a full 6 months of Prime for free. I searched FOREVER for the page to signup for that, and finally found it. It’s linked below as well!

Check out Daiso and Seria & the “Bunny Store” if you have kids-

Check out both of these stores during the first week you are here. Not only do they have super cute home decor (tons of Farmhouse style stuff, y’all) but they have TONS of household items that are only 100 yen, which equates to around 88-89 cents. I can’t even tell you how many things you can get here for 88 cents that somewhere on base would charge $8-$9 for. And they are almost always amazing quality- the only crummy quality I’ve found is mostly on the small toys, but my toddler is also brutal on his toys.
This is a great place to shop for cheap souvenirs for family or kiddos back home as well. Lots of traditional Japanese things without having to pay a pretty penny.
The biggest and closest Daiso is in the Shimoda Mall on the bottom floor, but there is another decently sized Daiso about 7 minutes from base.
Also, Japanese diapers are AWESOME quality, and usually cheaper than on base. You can find those at the “Bunny Store” along with some super cute baby/kid stuff! Just google a conversion chart to find the correct size for your kiddo. There is a Bunny Store close to base, and also one in the Shimoda Mall as well.

Just copy and paste the bold parts into your GPS search bar, coordinates/pins look weird sometimes but these should take you to the correct places.
Coordinates to Shimoda Mall:

40-1 Nakanotai, Oirase-chō, Kamikita-gun, Aomori-ken 039-2112, Japan

Coordinates to small Daiso by base:

1 Chome-50-2 Midorigaoka, Oirase-chō, Kamikita-gun, Aomori-ken 039-2187, Japan

Coordinates to Seria (Bunny Store is across the street):

(40.6728102, 141.3661819)