


We have had small pantries before, but man, this one in Japan takes the cake for BY FAR the smallest. We have tons of drawers that we can pile stuff in, but honestly it’s just so hard to find what we need when things aren’t sorted and organized.
I have found a bit of a love for open shelving, especially when items are displayed in beautiful jars and are so easily accessible. That being said, I also have a deep-seated hate for paying a lot for my home decor. (Hence my DIY hacks that are almost always under $20.)
So of course, I turned to my trusted Japanese Dollar stores for help.
So, I made a trip to both Daiso and Seria (the dollar stores here in Japan) and I got to work. In all reality, most dollar stores will have containers similar to the ones that I bought here. I decided to only stick with glass, simply because I knew it would probably withstand future moves better. (Fingers crossed for smart packers, right?)
I do recommend ONLY buying jars that are airtight for storing food, though. I purchased ones that were airtight, but also totally dishwasher safe.


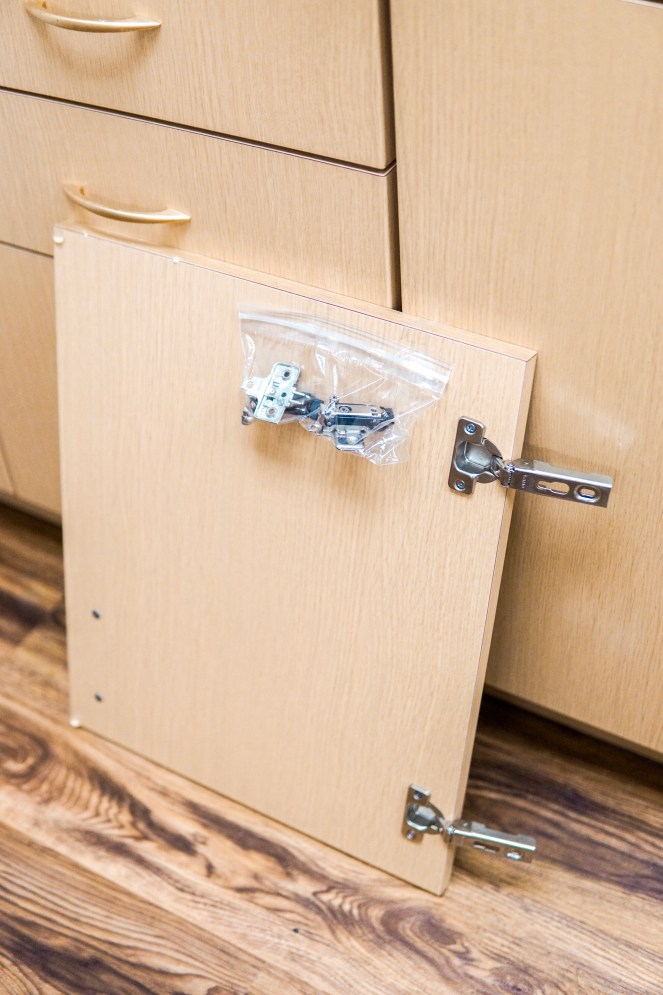
First, I removed the doors and hardware from the main pantry cabinet in our house. Read below for some tips on successfully removing hardware in rentals.

Next, I removed the hardware and doors from above the sink, just to give an accent cabinet to the room.


I mentioned this in my past post about how to convert a small closet to a mudroom, but here is the information again!
So, yes. Take off all of the hardware, and store them in a plastic baggy. Or, simply leave it attached to the doors! We take all the screws and pieces that don’t remain attached to the doors, and store them in a plastic baggy, then tape it with painter’s tape to the door. This way the tape doesn’t damage the door, but we are able to know for SURE that the hardware stays put with the door. When moving out, we just place the door with the taped hardware beside the closet for our housing inspection. (Or if you are required to replace the doors where you live, all the hardware is right there, and you don’t have to go searching for it!)
This way kids, pets, or adults don’t damage them in any way, and they are totally out of the way! We store ours underneath our king size bed, so they are totally hidden under there. (Thanks to our sweet friend Sierra, for the idea of storing things under couches or beds. This works so well for us.)


Happy hunting for those dollar store bargains, and be sure to share your pantries on Pinterest with me! (Here is a link to the board this is pinned to.) If you redo yours, I would LOVE to see the results on the “try it” section of my pin!

This was our second year visiting the azalea festival, and again, it didn’t disappoint. We even went before the azaleas were in full bloom this year, and it is SO worth the short trip from base. Located maybe 3 minutes from Namiki gelato, it really makes for a great day trip for families or even single service members.
Here is the pin directly to the parking lot: 40.697251, 141.151309
(If you go on the weekends, typically there will be city workers directing traffic.)
Here is the pin directly to the main shrine:
12ー1 Tenno, Shichinohe, Kamikita District, Aomori 039-2525
Here is the pin to the small park with playground equipment & other couple shrines:
30 Shichinohe, Kamikita-gun, Aomori 039-2525
There is LOTS of open space for kids to run, just please be respectful as the shrines are a place of worship. We brought our two year old and 8 month old, no problem. But we do make sure to keep them quiet and not let them run right next to the shrines.


The azaleas bloom in mid to late May, and usually there is a pretty good update on when they are fully flowered posted on Out the Gate. Most of these photos from this past weekend are when the blooms are only around 50-60% bloomed. Last year we went at full bloom- both trips were absolutely beautiful.


The shrines right around the big hill of azaleas are absolutely beautiful too, and it is worth climbing the HUGE hill to the left of the main hill to see a couple different shrines.


 After parking, there will be a small walk to the hill that the majority of the azaleas are planted on. Before you reach this, there is a small road to your left that will lead to a couple other shrines- this is where the tiny azalea trees are sold, as well. If you go under the big arch and up the big hill, there is also a small playground area for the kids. There are water fountains, porta-potties, and plenty of room to sit out if you decided to have a picnic as well. I recommend you wear bug spray though, because last year the mosquitos were pretty bad. This year we didn’t notice them.


We kept Henry (2.5) to the smaller wooden playground, but there are a couple pieces of equipment for bigger kids, too.


Definitely a must-see during the Spring. We always hit up Namiki afterwards, and did this day too- but I have SO many photos from this day, that I will save that for another post. Stay tuned.

Okay, so I say lots of things are my favorite… but these really are my favorite. If you’ve been to ANY holiday that we have hosted at our home, I will have made these. I LOVE them, because I always have cream cheese, and I always have crescent rolls. And they’re CHEAP. A couple bucks for crescent rolls, a couple bucks for cream cheese, and you have yourself a $4 – $5 dessert.

They’re also my favorite to make for meal trains, because they are so easy to make right alongside a main dish. As a very low-investment dessert, that’s always what I want when I am trying to multi-task.
I have tweaked my recipe over the past 4-5 years, and have decided this one is my favorite.
Tip: You can use different sized dishes to create different thickness levels of cream cheese. Personally, I like a very thick layer of cream cheese, but Drew likes them when there is more flaky parts. You can play around and decide what size works best for you (and also how many squares you will need.)
Ingredients
2 packages of 8oz cream cheese, room temperature
2 cans crescent rolls
1 1/2 cups sugar
2 tablespoons vanilla
1/4 cup melted butter, unsalted
1/2 cup sugar, mixed with 2 tablespoons cinnamon (if using unsalted butter, I add a couple pinches of salt to the mixture)
Instructions
1. Preheat your oven to 350°F.
2. Grease your baking dish. (13×9 is recommended.)
3. Unroll one can of crescent rolls, and spread it across the entire bottom of the pan. Pinch any seams, and make sure all areas are covered.
4. (Optional) Bake for a few minutes (usually 4-5) or until layer is just starting to rise and look less doughy. I let them get slightly golden, then remove them from the heat.
5. In a stand mixer (or by hand) mix together cream cheese and sugar until well combined. Scrape the bottom at least once.
6. Spread the cream cheese mixture evenly over the baked crescent roll. There most likely will be some lumps of cream cheese left- that is fine.
7. Roll the second crescent roll over top of the mixture, and pinch any seams together.
8. Pour melted butter over the top, and spread evenly with a brush or spoon.
9. Mix together sugar-cinnamon mixture in a bowl.
10. Sprinkle sugar-cinnamon mixture evenly over the top of the butter. Some parts will still be gooey, some will just look like sugar.
11. Bake 24-25 minutes, or until the top begins to brown.
12. Let cool first in the fridge, or eat warm. It is highly debated on which is better, but I think they are better cold!
Enjoy!
1. Gather your ingredients, and preheat your oven to 350°F. Make SURE that you leave out your cream cheese to come to room temperature. I typically take it out of the fridge 1-2 hours before prepping. This makes your cheesecake mixture blend SO much easier.

2. Grease your baking dish. I make sure to spray my dishes really well, because the squares just really seem to come out better when cooking spray has been used.
I usually use a 13×9″ glass pyrex or cake pan. I do occasionally make these in my round pyrex deep-dish, but to get a nice, even layer of cheesecake, I recommend a 13×9″.

3. Spread your first layer of crescent rolls over the bottom of the pan. Pinch together any seams.
4. Bake the first layer of crescent rolls until just barely brown. This is optional, but personally I think it makes them SO much better. I like to give the bottom a little extra baking time, just because I like these to have a fully baked bottom. If you don’t choose to prebake, they will still be baked in the regular cooking, but will likely be bit more doughy.
Thus, this isn’t 100% necessary, but I think it makes them so much better.

5. Mix together your cream cheese and sugar in a stand mixer. You can beat by hand, but cream cheese is rather hard to get lumps out of- so my KitchenAid really comes to the rescue for this recipe.


6. Spread the mixture evenly over the baked crescent roll layer. There will still be small lumps of cream cheese- that is perfectly fine, they will bake well.

7. Roll the last crescent roll evenly over your cream cheese mixture. Pinch together any open seams. I like to try to pinch the corners to the pan a little bit too- it keeps the butter from rolling down the sides when you pour it on.

8. Spread your butter evenly over the crescent roll. I choose to use unsalted butter, and add a pinch of salt to my cinnamon sugar. You can use salted butter, but in my experience I feel it gives the squares too salty of a taste. 
9. Mix your cinnamon and sugar together, and sprinkle evenly over top of the butter. There will be dry places and wet & gooey places.

10. Bake for 24-25 minutes, or until the top begins to brown and feels more firm to the touch. If you prefer a more chewy/gooey style, you can shave off 3-4 minutes. There isn’t really a way to underbake these, as long as you make sure the top layer of crescent rolls are fully baked.

And voila! I could eat an entire pan of these in one day, and full disclosure: I have. They’re addicting and SO good for sharing with friends.

Enjoy!

Weight: 7 months: 16lbs, 10oz & 27 inches long.
8 months: My scale today says she’s 21.4lbs, which wouldn’t surprise me because she’s huge, but that also seems like a huge jump from 7 months. Maybe I will actually weigh her on my fancy scale and update this. Probably not.

Eye Color: Blue, blue, blue. Our friends tell us she has white walker eyes.

Hair: Blonde! It has finally started to come in thicker, and as of month 8 she can officially wear a clip bow, and it is finally starting to touch/cover her ears!
Size: 9-12 months. 12/18 month pants fit her butt best, but she could still wear 6 month tops, honestly. Baby has some THIGHS, that’s for sure.

Ellie knows I come into a room the second I do. She senses me, she follows me, she never takes her eyes off of me.


Month 7 was fairly uneventful, but man, month 8 was nuts. Dealing with HFM seemed like it consumed all of the last YEAR, even though we were only sick for around 7 days all together. It was BRUTAL for Henry and I.


Girlfriend handled her fever and spots the best by far out of all of us, still smiling while she had a 103 degree fever. By the way, she smiles ALL. THE. TIME. Like, you can just make eye contact with her and she will smile. She is definitely a mean mugger to those she isn’t sure about, though. Much like Henry did at her age, she has the eyebrows for glaring.


My favorite new Ellie-ism is the fact that she hyperventilates like 90x per day. Any time something is even remotely funny, you will hear her hyperventilate laugh at it. Daddy is her favorite to do this to.

Girlfriend LOVES food. LOVES it. The boob, purees, random cheerios off the ground, whatever is on our plates- she is ALL about it. She is much better at eating semi-solids than Henry is. Ellie loves the little yogurt melts and can easily handle whole ones. We broke up Henry’s into small pieces for months and months longer than we have to with her. The girl will down a whole package in no time at all.


Ellie likes to randomly stand in the middle of the room, and is ALMOST walking. I am betting that month 8 will be the “walks unassisted” month, but perhaps it will be month 9.

She LOVES her brother, which clearly hasn’t changed since birth. This month, Henry is starting to love her. And by love her, I mean he screams “AHH! SISSY! SHE COMING! SHE COMING!” when she starts crawling towards him. He also tickles her regularly, and pushes her over if she stares at him too long.

Much like Henry, Ellie loves the outside. She absolutely hates her carseat, but does sleep rather well in the car if we take long rides.


Girlfriend still has some serious stranger-danger. Mama is still the only one she loves consistently, but Drew is starting to grow on her, FINALLY. She grins every day when Daddy comes home, as of 8 months old.


Ellie has two teeth, but sported one single tooth on the bottom for her entire 7th month. I was REALLY hoping that the one top tooth she has coming in would pop through before her second bottom one. Can you imagine a baby with only one top and one bottom tooth?!


She likes to smile with both her top and bottom teeth, and her overbite is so bad that her top gums completely cover her bottom teeth. It’s rather hilarious.


Baby girl unfortunately still has her heart defect- we are hoping at her 12 month cardiologist appointment we will find that it has closed.

Ellie’s favorite word is “mama” and she says it ALL night when she wakes up. “MAMAMAMAMAMAMA.”
She also thinks it’s hilarious to repeat it when I ask her to say “mama.” She will say “mama,” “dada” and sometimes shakes her head yes and no. She also will punch me in the face if I ask her if “she wants a boobie.” Apparently that is a stupid question, because yes, yes she does.

Ellie loves Blippi too, and will watch any time her brother is watching. Girlfriend is also almost as obsessed with the cats as Henry.
 I will do a Henry update separately soon, but he is a doll as well. Everything in his world is exciting, and my favorite thing in the world is the fact that he will run up an entire flight of stairs, just to tell us about the number 3. The kid is a hoot right now, and learns so much every day, I swear. He is cuddly and sensitive and ornery and strong-headed, and I think that three is going to be so much harder than two, but also so much more fun.

But this little goober of a girl just lights up our whole world. It seems like there has never been a part of our lives without our Ellie, but I also can’t believe she is well on her way to turning one.
Probiotics are our GO-TO during cold and flu season. We cling to the stuff to make sure that our immune system is strong, and our family is protected when that bad bacteria is circulating so rampantly.
I’m a kombucha, yogurt, kimchi, and kefir fan, but never in a million years did I think I could
 get my probiotics through my lifeblood: coffee.
Here’s the thing… When I first heard about vitamin-infused coffee, I was totally skeptical. I mean, VITAMINS? In COFFEE? I just knew that as soon as I sipped that first brewed cup, I would be greeted with the bitter, horrible taste you get when you leave a vitamin in your mouth too long and it starts to dissolve.
I’m happy to say that I was SO wrong with that assumption.
I applied for a collaboration with VitaCup a few months ago, tasted their Energy Blend in a French Roast, and fell in love. I HAD to get my hands on their Probiotic Blend, because probiotics are huge in our home, so I reached out to them to collaborate a second time. I must say that the French Roast is still my favorite, but I love their Probiotic Blend, especially with the hints of vanilla I catch every time I take a sip.
So, aside from me genuinely loving the taste, why do I choose to consume probiotics through their coffee?

Maintaining a balance of good bacteria in your gut is so important for SO many reasons. Seriously, Google it. Immune system, digestion, weight loss/maintaining healthy weight, brain function… you name it, there is likely evidence that probiotics directly or indirectly support it working properly.
Bacteria lives naturally in your gut, even the nastiest and scariest of bacterias. It’s just a fact of life, they are there! Adding good microorganisms, in partnership with getting good sleep, eating a nutrient-rich diet, and maintaining healthy stress levels can boost your immune system so that you never fall victim to those scary, gross germs that are naturally residing within your gut.
And I mean, who likes gas, diarrhea, or bloating just in general?! Not me, that’s for sure.
Whether you have chronic gastrointestinal issues such as Irritable Bowel Syndrome or just face regular everyday digestion issues, probiotics and prebiotics can be one of the greatest things you can put in your body to keep these nasty conditions away.

VitaCup knows what they’re talking about when they say that everyone forgets their vitamins, but no one forgets their coffee. I mean, what parent does forget their morning coffee?
When my eyes open in the morning to Henry’s fingers poking my face saying, “wake up, wake up, wake up, wake up,” I can tell you the first thing on my mind isn’t about my probiotics or vitamins. Rather, my first thought is “GET ME SOME DANG COFFEE.”
By consuming your probiotics and antioxidants in your coffee, you can almost guarantee you won’t forget to fill your gut with the good stuff.

I mean, duh.
You need microorganisms that can withstand the heat of brewing in order to live and thrive in your gut.
Most probiotic strains are not heat resistant, and several actually even have to be stored in the refrigerator- one of the reasons I never imagined being able to drink my probiotics in my coffee. VitaCup has picked the perfect strain; allowing for the probiotics to thrive in the hot coffee.
The Mr.Coffee website claims that the best tasting cup of coffee, no matter what brewer or coffee you use, is consumed between 120-140 degrees Fahrenheit. As stated in a US National Library of Medicine/National Institutes of Health article, the particular strain of microorganisms used in VitaCup’s Probiotic Blend have been shown to activate and grow in up to 149 degrees Fahrenheit. So not only will your cup of coffee be the perfect temperature to drink after a few minutes, but the probiotics will be absolutely thriving in the heat of it, too.

Honestly, I have known about probiotics for years, but I had no idea what “prebiotics” were, or why they were important at all.
Prebiotics are almost as essential as probiotics, in the fact that probiotics do not thrive without them. Prebiotics are a form of non-digestible fiber that probiotics feed on, meaning that both probiotics and prebiotics are necessary for a healthy and balanced gut. You can find prebiotics in many forms, mostly through leafy greens.
VitaCup’s probiotic blend includes Aloe Vera and B vitamins, which act as “prebiotics,” feeding the good bacteria to keep them growing.

I love that VitaCup is conscious about the environment; and I know this is one of the main concerns that so many have regarding single-serve brewers and pods. After all, those things add up if you are like me and drink several cups of coffee every single day. Their pods are 100% recyclable, and totally BPA free.
And, to top it all off, VitaCup gives back. A portion of their sales goes to Vitamin Angels in order to help provide vitamins to battle deficiencies across the globe. So as you drink your coffee, you are not only helping to provide for your own body, you are simultaneously helping the health of another individual across the globe.
So, it’s pretty clear that I absolutely adore the VitaCup family, and all that they are currently working on. Their company has things pretty figured out, in my opinion. Not only do they have amazing blends, but their customer service is fantastic, they are beginning to expand to major retailers, and their coffee seriously tastes GOOD. (It’s the only coffee I will drink black!)
I’ve linked my two favorite blends below, as mentioned above, but a comprehensive list of all of their blends can be found here.
I mean it, if you are skeptical, give them a try. I didn’t expect a vitamin coffee to replace my list of favorite coffees, but they did just that. Why not do double-duty for your body while drinking your favorite coffee? Win-win in my book!
Sources


