DIY · Home · Japan Life · Rental Decorating

Tiny Pantry Renovation |Rental Friendly Decorating

We have had small pantries before, but man, this one in Japan takes the cake for BY FAR the smallest. We have tons of drawers that we can pile stuff in, but honestly it’s just so hard to find what we need when things aren’t sorted and organized.

I have found a bit of a love for open shelving, especially when items are displayed in beautiful jars and are so easily accessible. That being said, I also have a deep-seated hate for paying a lot for my home decor. (Hence my DIY hacks that are almost always under $20.)

So of course, I turned to my trusted Japanese Dollar stores for help.


So, I made a trip to both Daiso and Seria (the dollar stores here in Japan) and I got to work. In all reality, most dollar stores will have containers similar to the ones that I bought here. I decided to only stick with glass, simply because I knew it would probably withstand future moves better. (Fingers crossed for smart packers, right?)

I do recommend ONLY buying jars that are airtight for storing food, though. I purchased ones that were airtight, but also totally dishwasher safe.

www.joyfulcrew.com.jpg

Daiso flowers displayed in a Daiso feed sack
All jars from Daiso. Top jars were 250 yen each, and the bottom ones were 100 yen each.
The hooks installed on my wall are also from Seria, and are the same hooks I used to make my DIY coat rack. I have not yet gone over the screws with my iron paint to make them not a super glaring silver- oops. 😉 The two small grey baskets can be found at Daiso, and come with the lids. They are also stackable! Jars with the white handle lids come from Seria. These are the BEST with our toddler, because he picks up what he wants and carries it to us.

First, I removed the doors and hardware from the main pantry cabinet in our house. Read below for some tips on successfully removing hardware in rentals.

My white bowls are from Target YEARS ago, unfortunately they no longer carry them, but I am waiting to find some similar to link for you. The regular mason sized jars on the bottom come from Daiso.

Next, I removed the hardware and doors from above the sink, just to give an accent cabinet to the room.
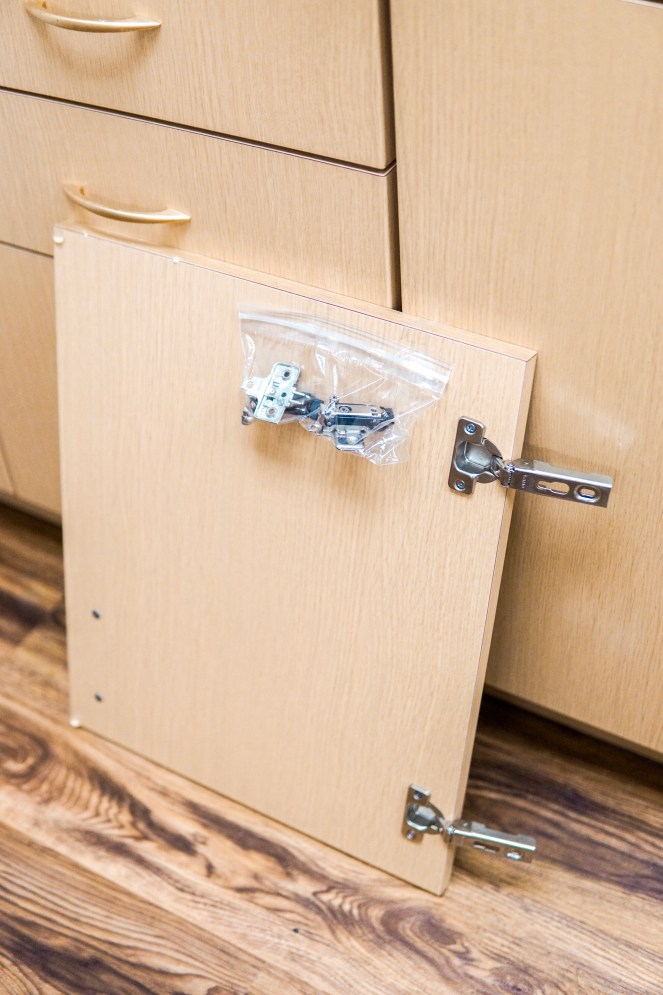
300 yen jars from Daiso- these hold our entire supply of rice, pasta, and several boxes of our cereal. Get rid of ugly boxes, and you can see EXACTLY how much you have. Win-win.

Tips:

Take off hardware, and store them in a plastic baggy.

I mentioned this in my past post about how to convert a small closet to a mudroom, but here is the information again!
So, yes. Take off all of the hardware, and store them in a plastic baggy. Or, simply leave it attached to the doors! We take all the screws and pieces that don’t remain attached to the doors, and store them in a plastic baggy, then tape it with painter’s tape to the door. This way the tape doesn’t damage the door, but we are able to know for SURE that the hardware stays put with the door. When moving out, we just place the door with the taped hardware beside the closet for our housing inspection. (Or if you are required to replace the doors where you live, all the hardware is right there, and you don’t have to go searching for it!)

Store your doors under a couch or bed.

This way kids, pets, or adults don’t damage them in any way, and they are totally out of the way! We store ours underneath our king size bed, so they are totally hidden under there. (Thanks to our sweet friend Sierra, for the idea of storing things under couches or beds. This works so well for us.)

The largest 300 yen storage containers.
These are 100 yen containers that I believe that have BOTH at Seria and Daiso. If I remember correctly, these came from Daiso. It was just big enough to hold our bag of granola and our bag of quinoa.
All of the above are from Daiso. The cross hatch storage baskets are my FAVORITES too. I have these in our closet upstairs, and you can also purchase lids that allow them to be fully stackable.
I keep my non-refridgerated pantry items in small crates from Daiso (100 yen) that allow air to flow through them.
Very top containers are from Seria, and 100 yen each. I use these for my granola and overnight oats. The beige containers are from Daiso (100Â¥ each!) Unfortunately my flour and sugar jars (the four across with the pattern) are SUPER old and from Target. I will link some if I find them!

Happy hunting for those dollar store bargains, and be sure to share your pantries on Pinterest with me! (Here is a link to the board this is pinned to.) If you redo yours, I would LOVE to see the results on the “try it” section of my pin!

signature(heart)


DIY

$10 DIY Dollar Store Farmhouse Wreath: Daiso Lamb’s Ear

My sweet friend Shannon told me about Daiso the first week we were in Japan, and my entire house is basically filled with treasures from this golden Japanese dollar store. But it wasn’t until recently that it hit me just HOW MANY things you can make from the treasures at Daiso & Seria.
Between lots of doctor appointments and craziness this week, I have started several styles of wreaths to share with you. Make sure you follow my Instagram, Facebook, or Pinterest pages to not miss any of the wreath tutorials I will be posting, because I am making several! (Social buttons are on the side toolbar.) I am also considering doing a Daiso DIY series on the blog with hundreds more projects- mostly farmhouse, rustic, and chic styles. If you’re following along, you won’t miss anything!

Up for today: lamb’s ear farmhouse style wreath. (The stems are labeled as sage at Daiso, though I think they much more resemble lamb’s ear.)
These wreaths sell for anywhere for $30-$70 on Etsy!


You will need:

  • (1) wreath ring, they have these at Daiso in various sizes. I chose the 30cm size, making this approximately a 12″ wreath (around 15″ wide once you add leaves.)
  • (5-10) stems of lamb’s ear. Amount is dependent on what size/how full you would like the wreath. I believe I used 8 stems of greenery, plus the floral.
  • (1-4) stems of floral (totally optional, I chose to buy 3 stems of white flowers to add, two of them were individual “roses,” and one was a multi-flower stem.
  • (1) hot glue gun & glue sticks

If you choose absolutely everything that I did, the total cost comes out to around $11 total when you factor in the conversion rate. Take off the floral and just make a plain lamb’s ear wreath, and you’re looking at a cost of about $8 or $9!

The greenery on the far right is for another wreath as are the smaller white flowers (stay tuned for that post.) I used the big, fluffy white roses shown in the top.

These lamb’s ear stems are 100yen each, equating to about 88 cents each. I bought eight to cover the wreath ring that I bought- you can feel out how many you personally need dependent on what size of wreath you’d like to make. I think it is easiest to just lay them out on top of the wreath in the store to give you a good visual. I bought the 30cm willow wreath ring for 200 yen, and laid out all my stems on it to decide how many I would need.

Start off by cutting all the tags off your stems. I began by weaving the stems into the willow ring, adding all my stems all the way around the wreath. You will hot glue parts of the stems down, but the more you can weave them in, the better it will obviously stay. Most of the stems from Daiso have wire within them, allowing you to bend them the way you would like.

As you weave them in, they will look similar to this. Very spread out with lots of leaves upside down, but fairly even coverage across the wreath.

Next, begin to hot glue some of the leaves down, and begin to turn all the leaves face up. I like to take photos throughout the process, because this helps me to see where the empty, uneven spaces are. These particular leaves don’t always love to stick well to the hot glue, so sometimes you have to use a little more than you usually would.

You can see the idea above. The part I am pointing to has the leaves adjusted and glued down, while the rest does not. You won’t need to glue every leaf, just feel out which ones seem like they are too wild to leave freely. These particular stems also allow you to adjust each individual leaf, as mentioned above. If some are facing backwards, you can spin them around to face forward.

Don’t be afraid to take the stems completely apart and glue them to new sections, too. I often destruct at least one or two stems in order to add individual leaves in where I feel it is more bare.

Lastly, lay your flowers out and decide how you like them. Once you find a design you like, hot glue them in as well. They usually stick best if you glue them directly to the willow leaf, not to the stems.

When you’re done, your leaves should be evenly spaced. Glue down any loose pieces that seem like they may fall off, and move various leaves to cover any glue spots seen.

And voila! You have created a $10 wreath that can be utilized in so many ways!

diy wreath 1.jpg


Happy crafting, friends!